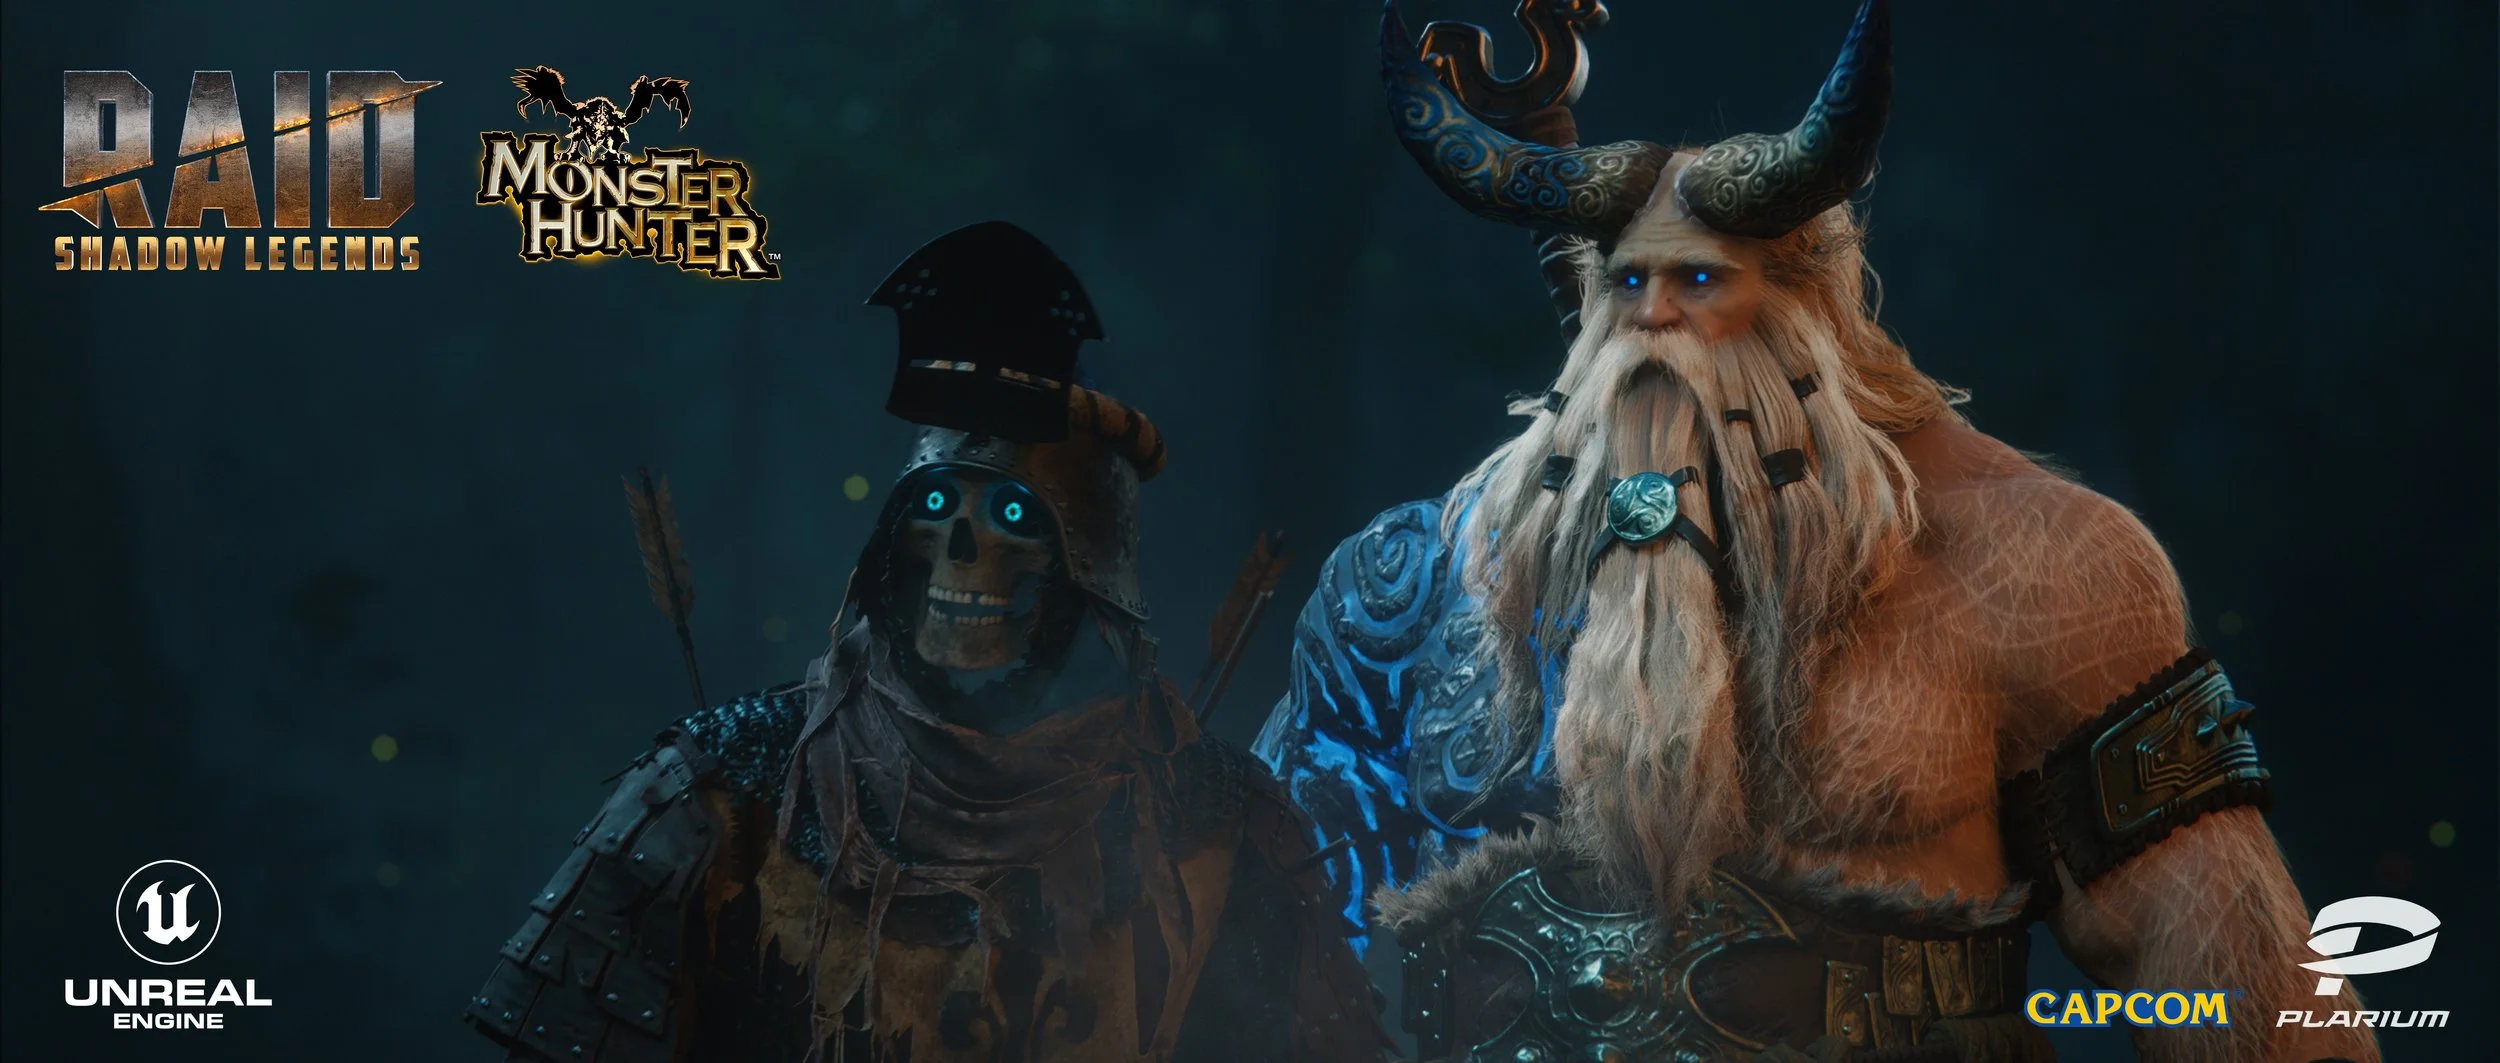
Unobtainium, our valued client, approached us with a thrilling proposition—an ambitious game trailer project that would intertwine two gaming juggernauts: Raid Shadow Legends, owned by Plarium, and Monster Hunter, a Capcom IP. It was a chance to create something truly exceptional, merging the worlds of these iconic games, and we were eager to embark on this journey.
If you haven't had the chance to watch the completed trailer yet, please take a moment to view it below:
From the outset, we recognised the importance of laying a solid foundation. Plarium provided the initial script, and in close collaboration with Unobtainium, we worked tirelessly to refine it. These discussions were pivotal in ensuring that our creative vision harmonised seamlessly with their aspirations. We needed to establish the parameters of what was achievable, especially when it came to rendering the project in Unreal Engine—a pivotal choice given its prominence in the visual effects and CGI animation realm.
Setting the Visual Blueprint: Storyboarding
With the script in place, Unobtainium took the reins to produce the initial storyboards. These storyboards played a crucial role in uniting our team and the game studios, offering a visual roadmap for the project. However, we recognised the need for flexibility, particularly in crafting complex action sequences. To accommodate this, we agreed to keep some areas of the storyboards intentionally loose, allowing us to fine-tune the intricacies as we progressed into the previsualization stage of production.
It's essential to emphasise that Unobtainium's storyboards served as the cornerstone, aligning everyone with the project's overarching concept. Building upon this visual foundation, we took the reins to execute the rest of the production, leveraging Unreal Engine's capabilities to bring this ambitious crossover to life.
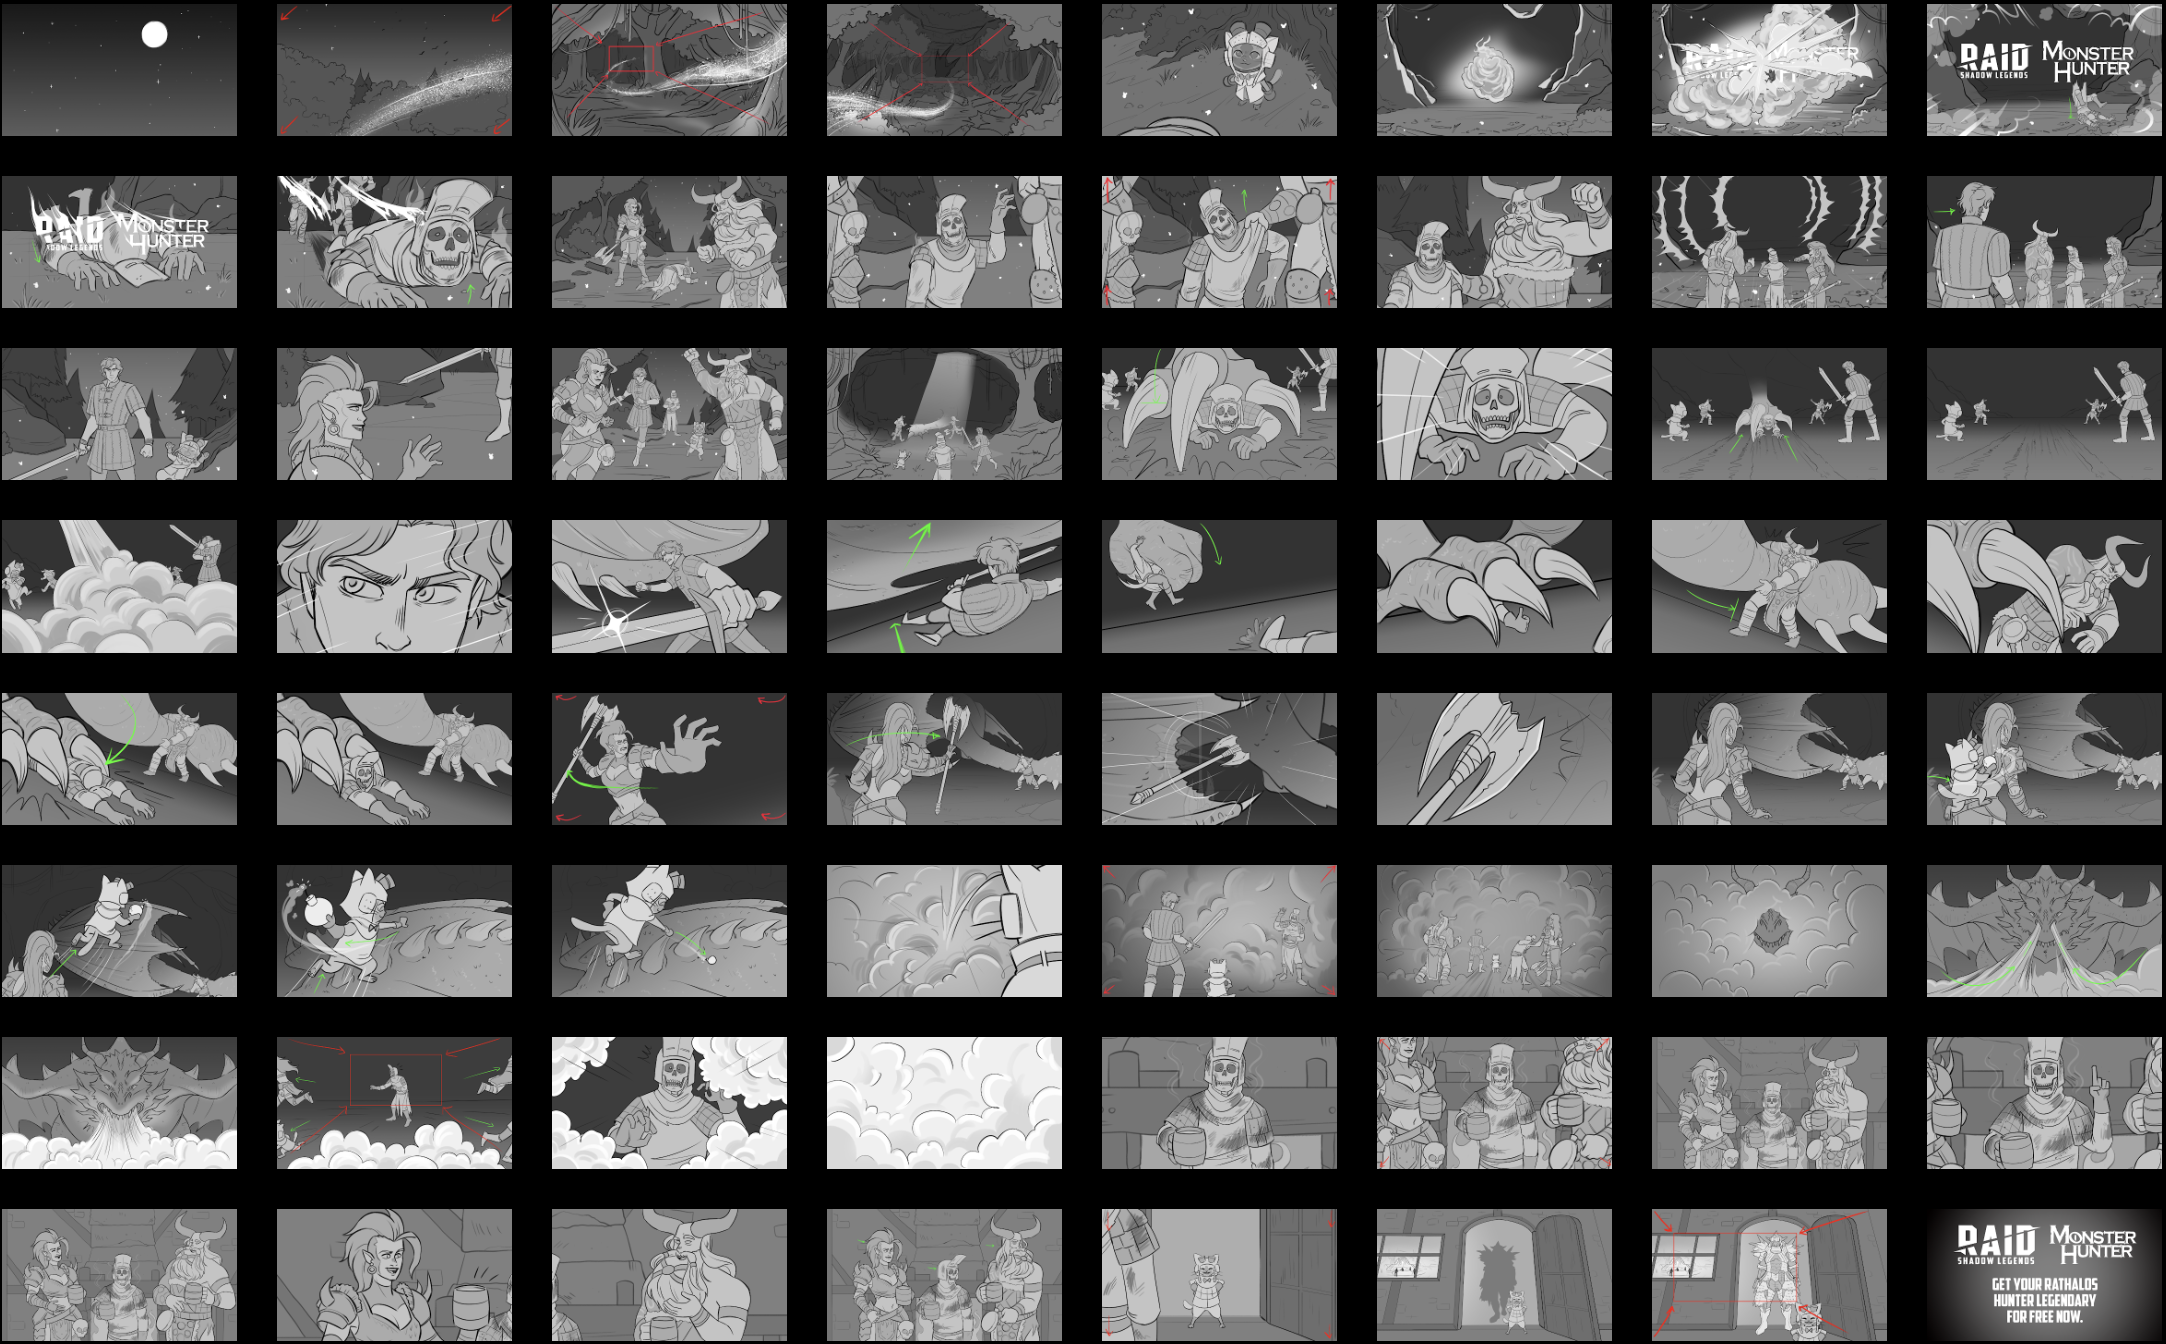
THE BOARDAMATIC
After finalizing the storyboard, our immediate focus shifted towards refining its timing, allowing us to gauge the spot's overall pace before advancing to the subsequent stages of production. During this phase, we keenly identified specific narrative elements that required streamlining to maintain a seamless flow and a suitable runtime. In addition, we introduced placeholder text to represent the forthcoming dialogue in the trailer. Notably, the boardamatic, playing on repeat, can be found adjacent to this text in the blog, providing valuable visual context.
The Concept Art Journey
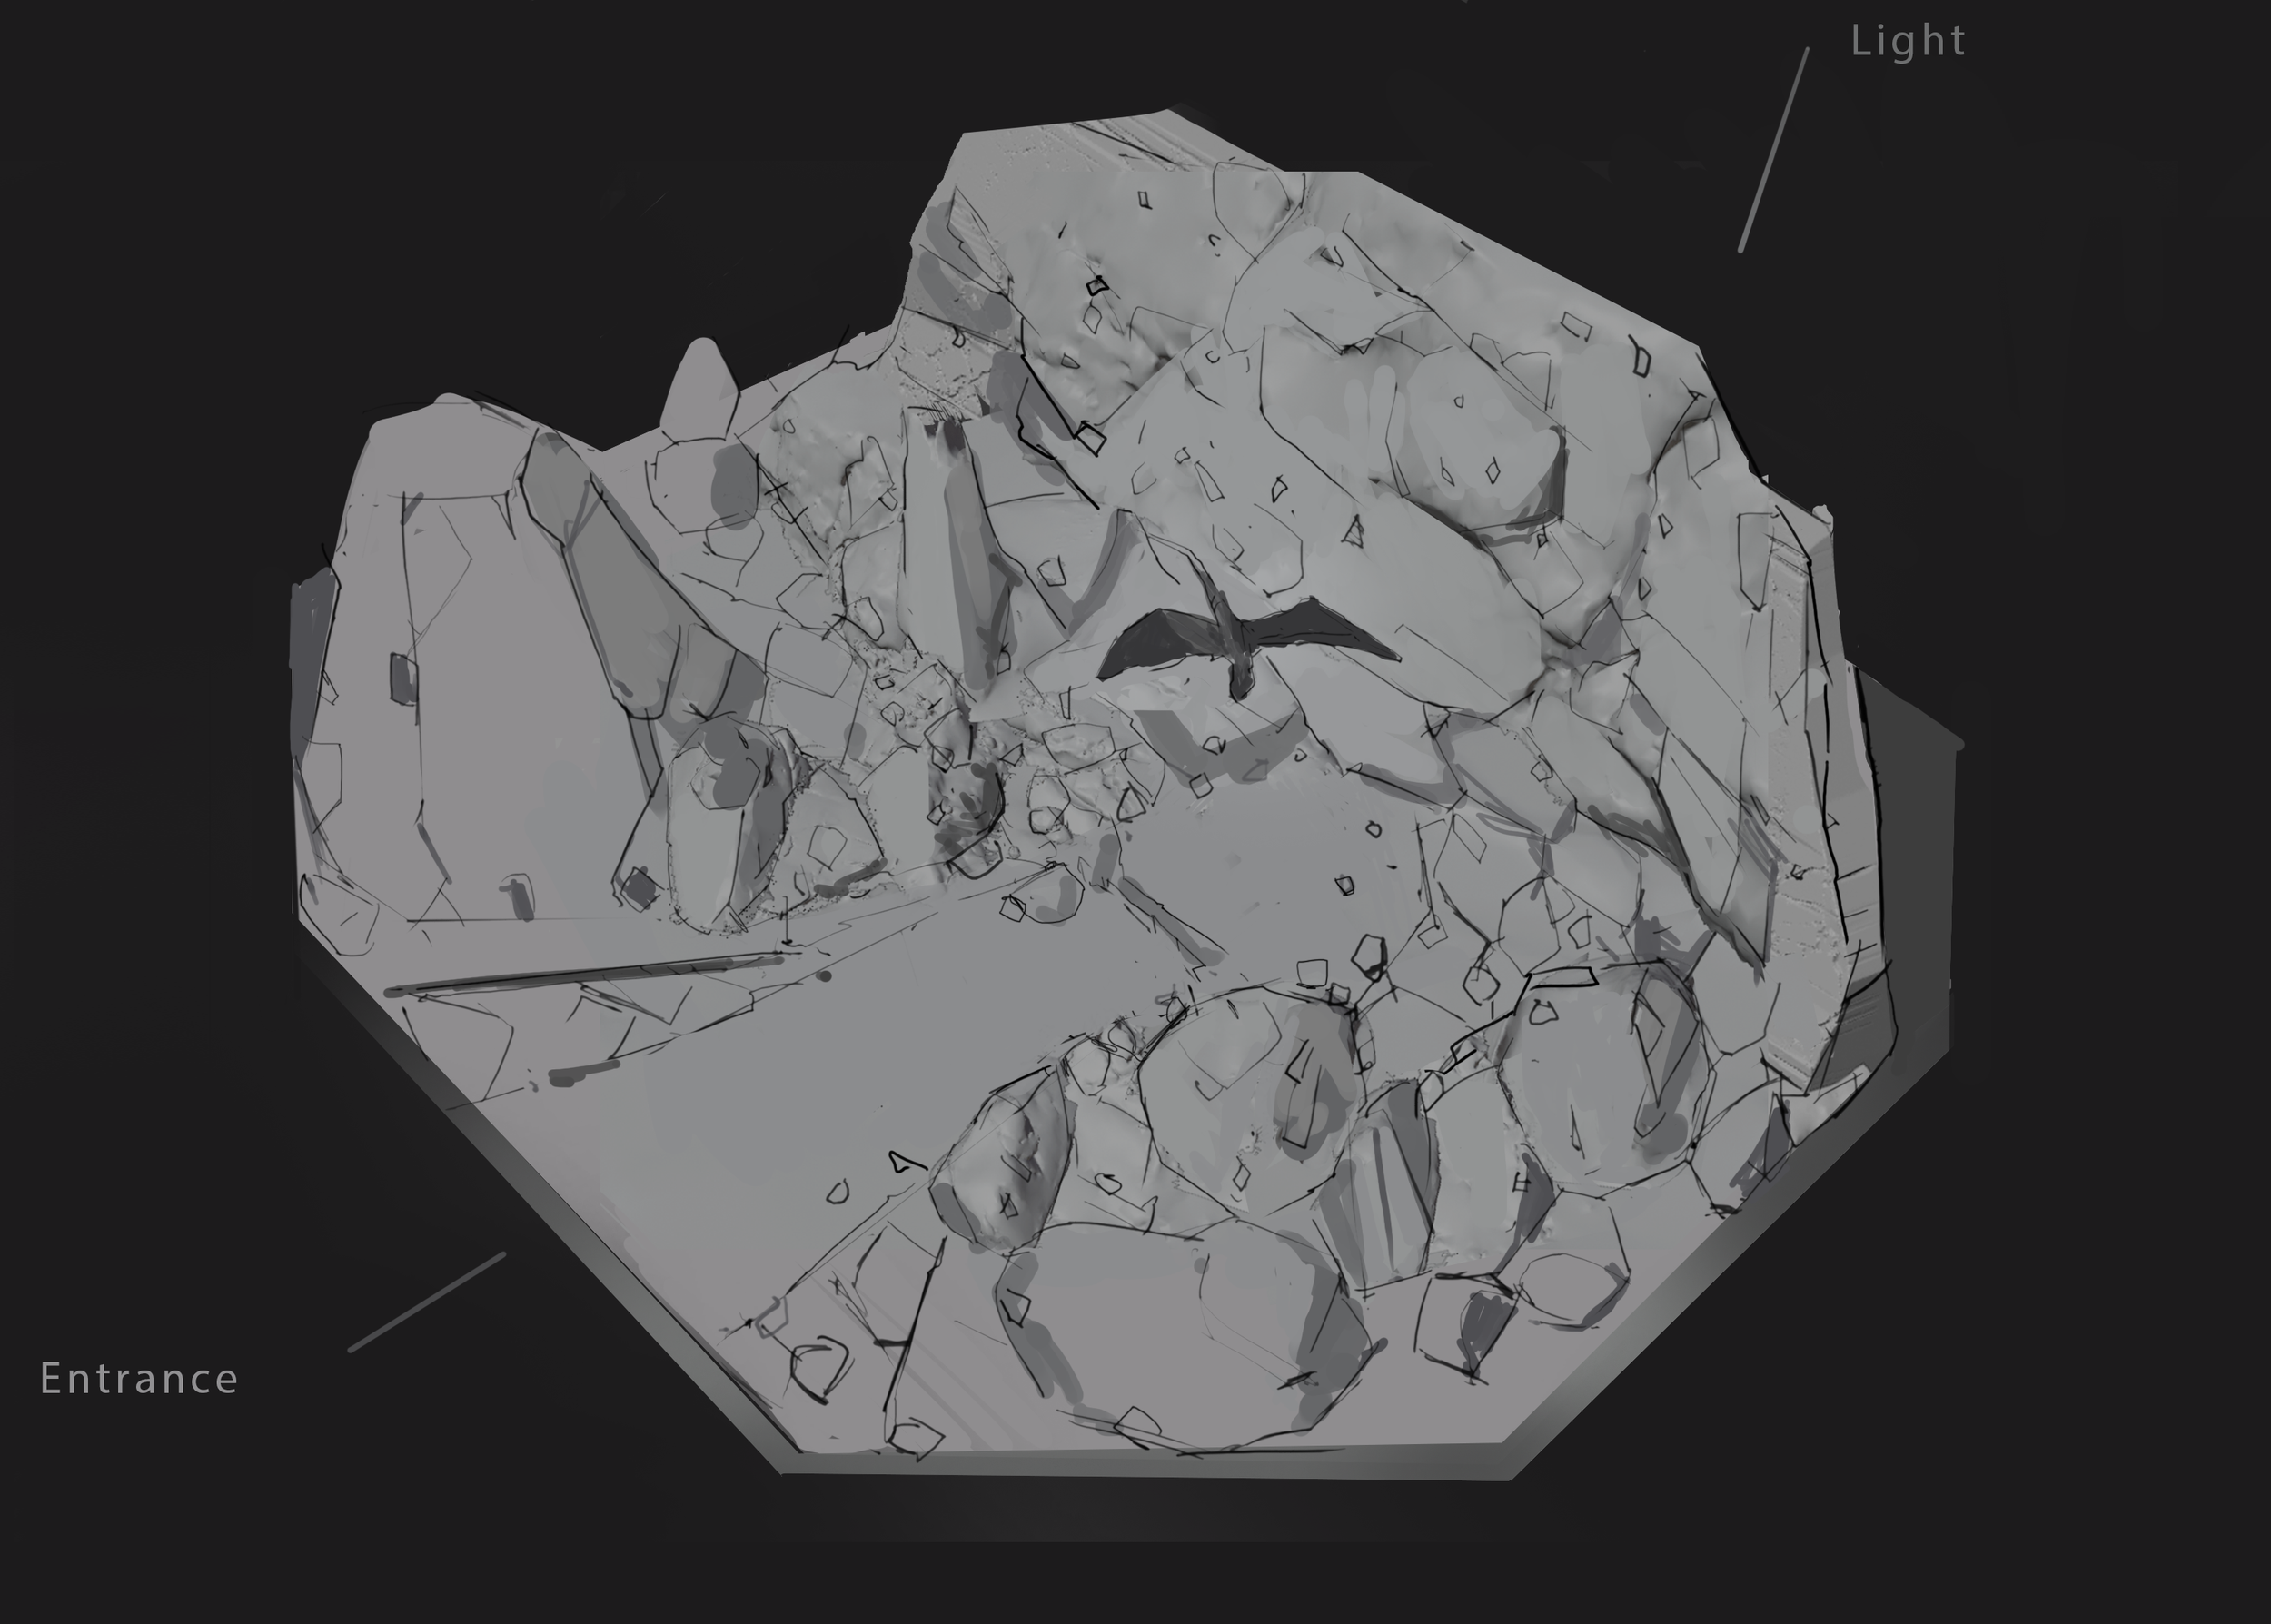
In this pivotal phase, we embarked on an artistic odyssey to conceptualise and breathe life into the main locations that set the stage for our cinematic game trailer: the enchanting forest, the enigmatic cave entrance and exterior, the mysterious cave interior, and the inviting tavern that awaits at the trailer's climax.

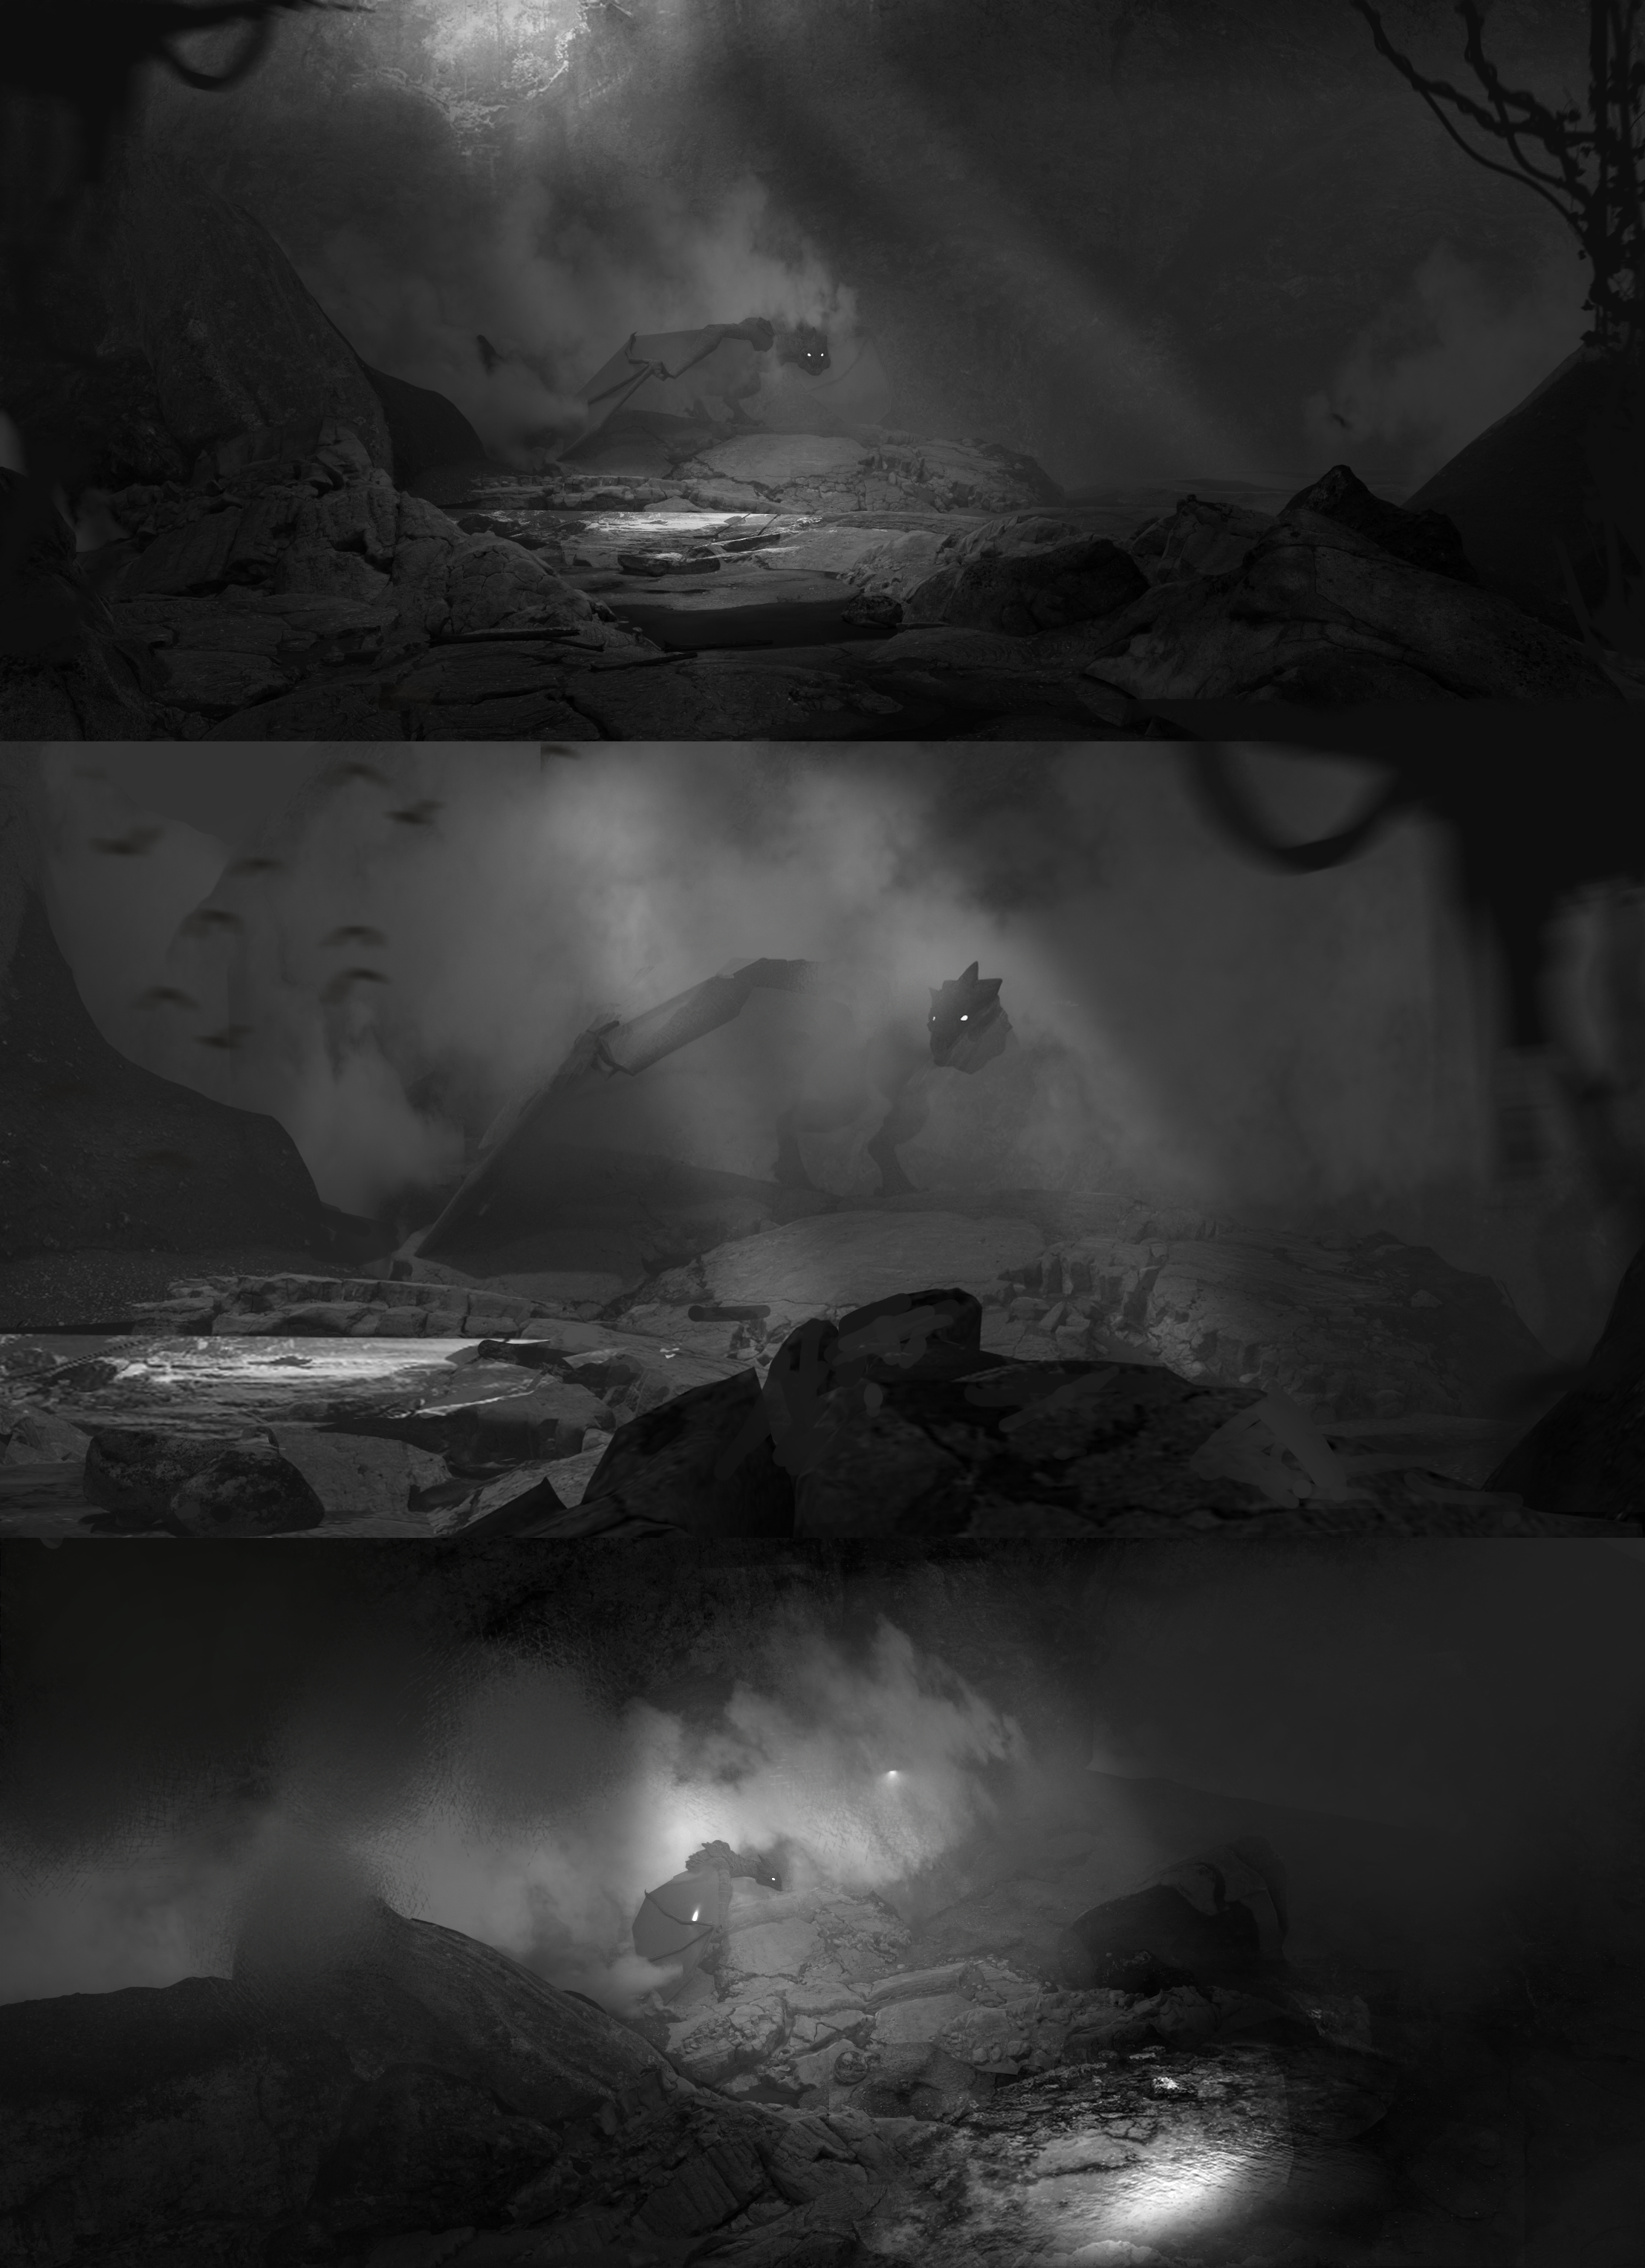
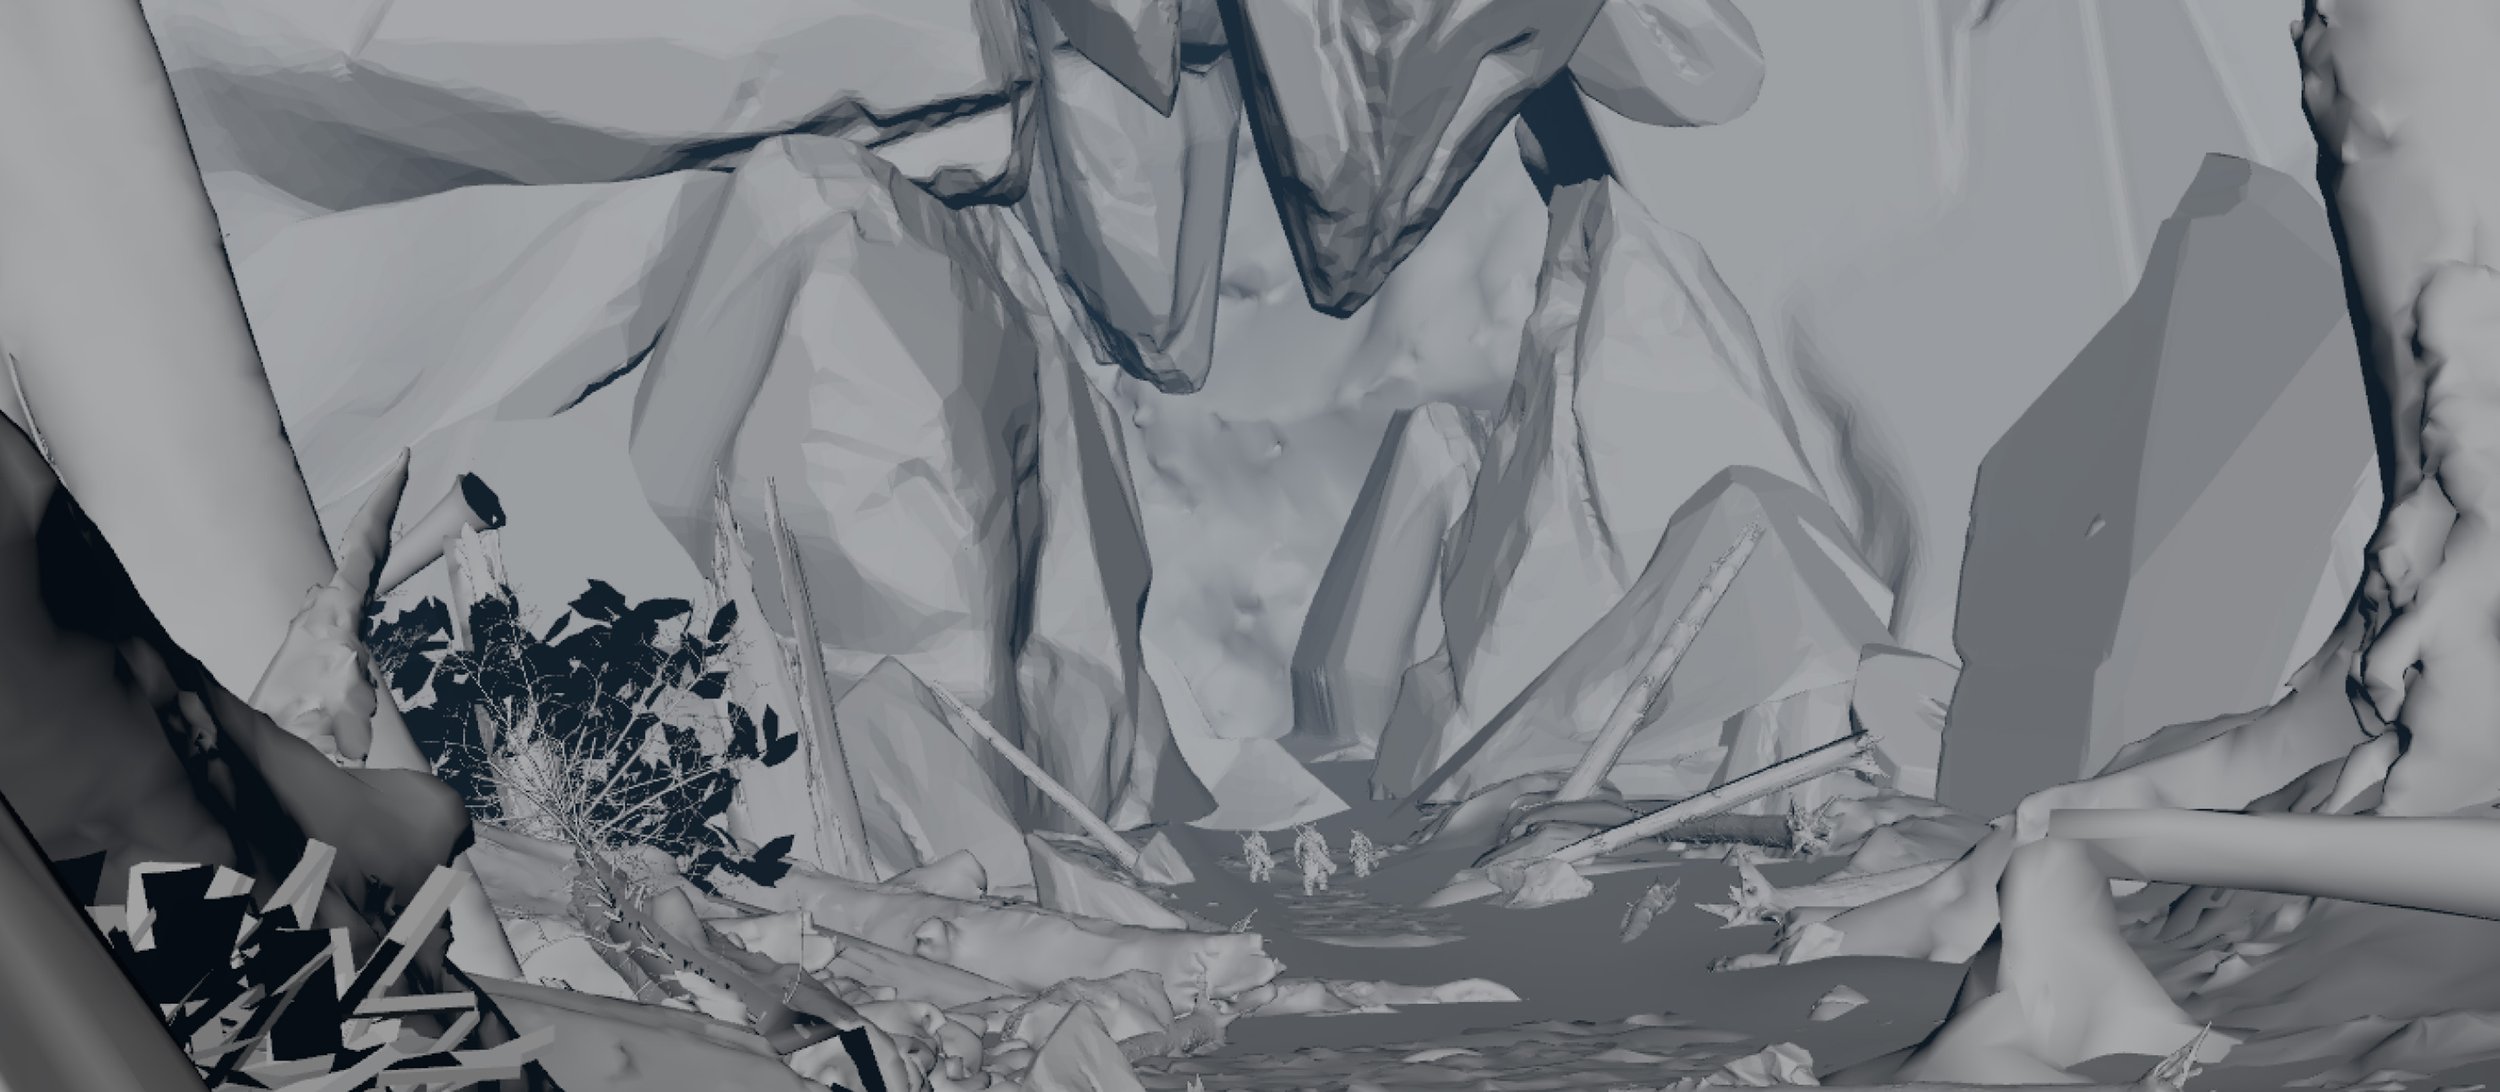
In the cave exterior, we meticulously crafted an entrance resembling a menacing claw, serving as a foreboding gateway. This design hinted at the lurking danger within, where a dragon had arrived through a portal, seeking refuge but not residing there permanently. The path leading to the cave bore witness to destroyed trees, evidence of the dragon's tumultuous journey to what it believed was a safe haven.


Inside the cave, we strategically placed an opening in the ceiling to introduce beams of light that pierced the oppressive darkness. Pockets of fire illuminated the cavern, alluding to the dragon's presence. The trailer artfully concealed this revelation until the climactic battle within, maintaining an atmosphere of suspense and mystery.
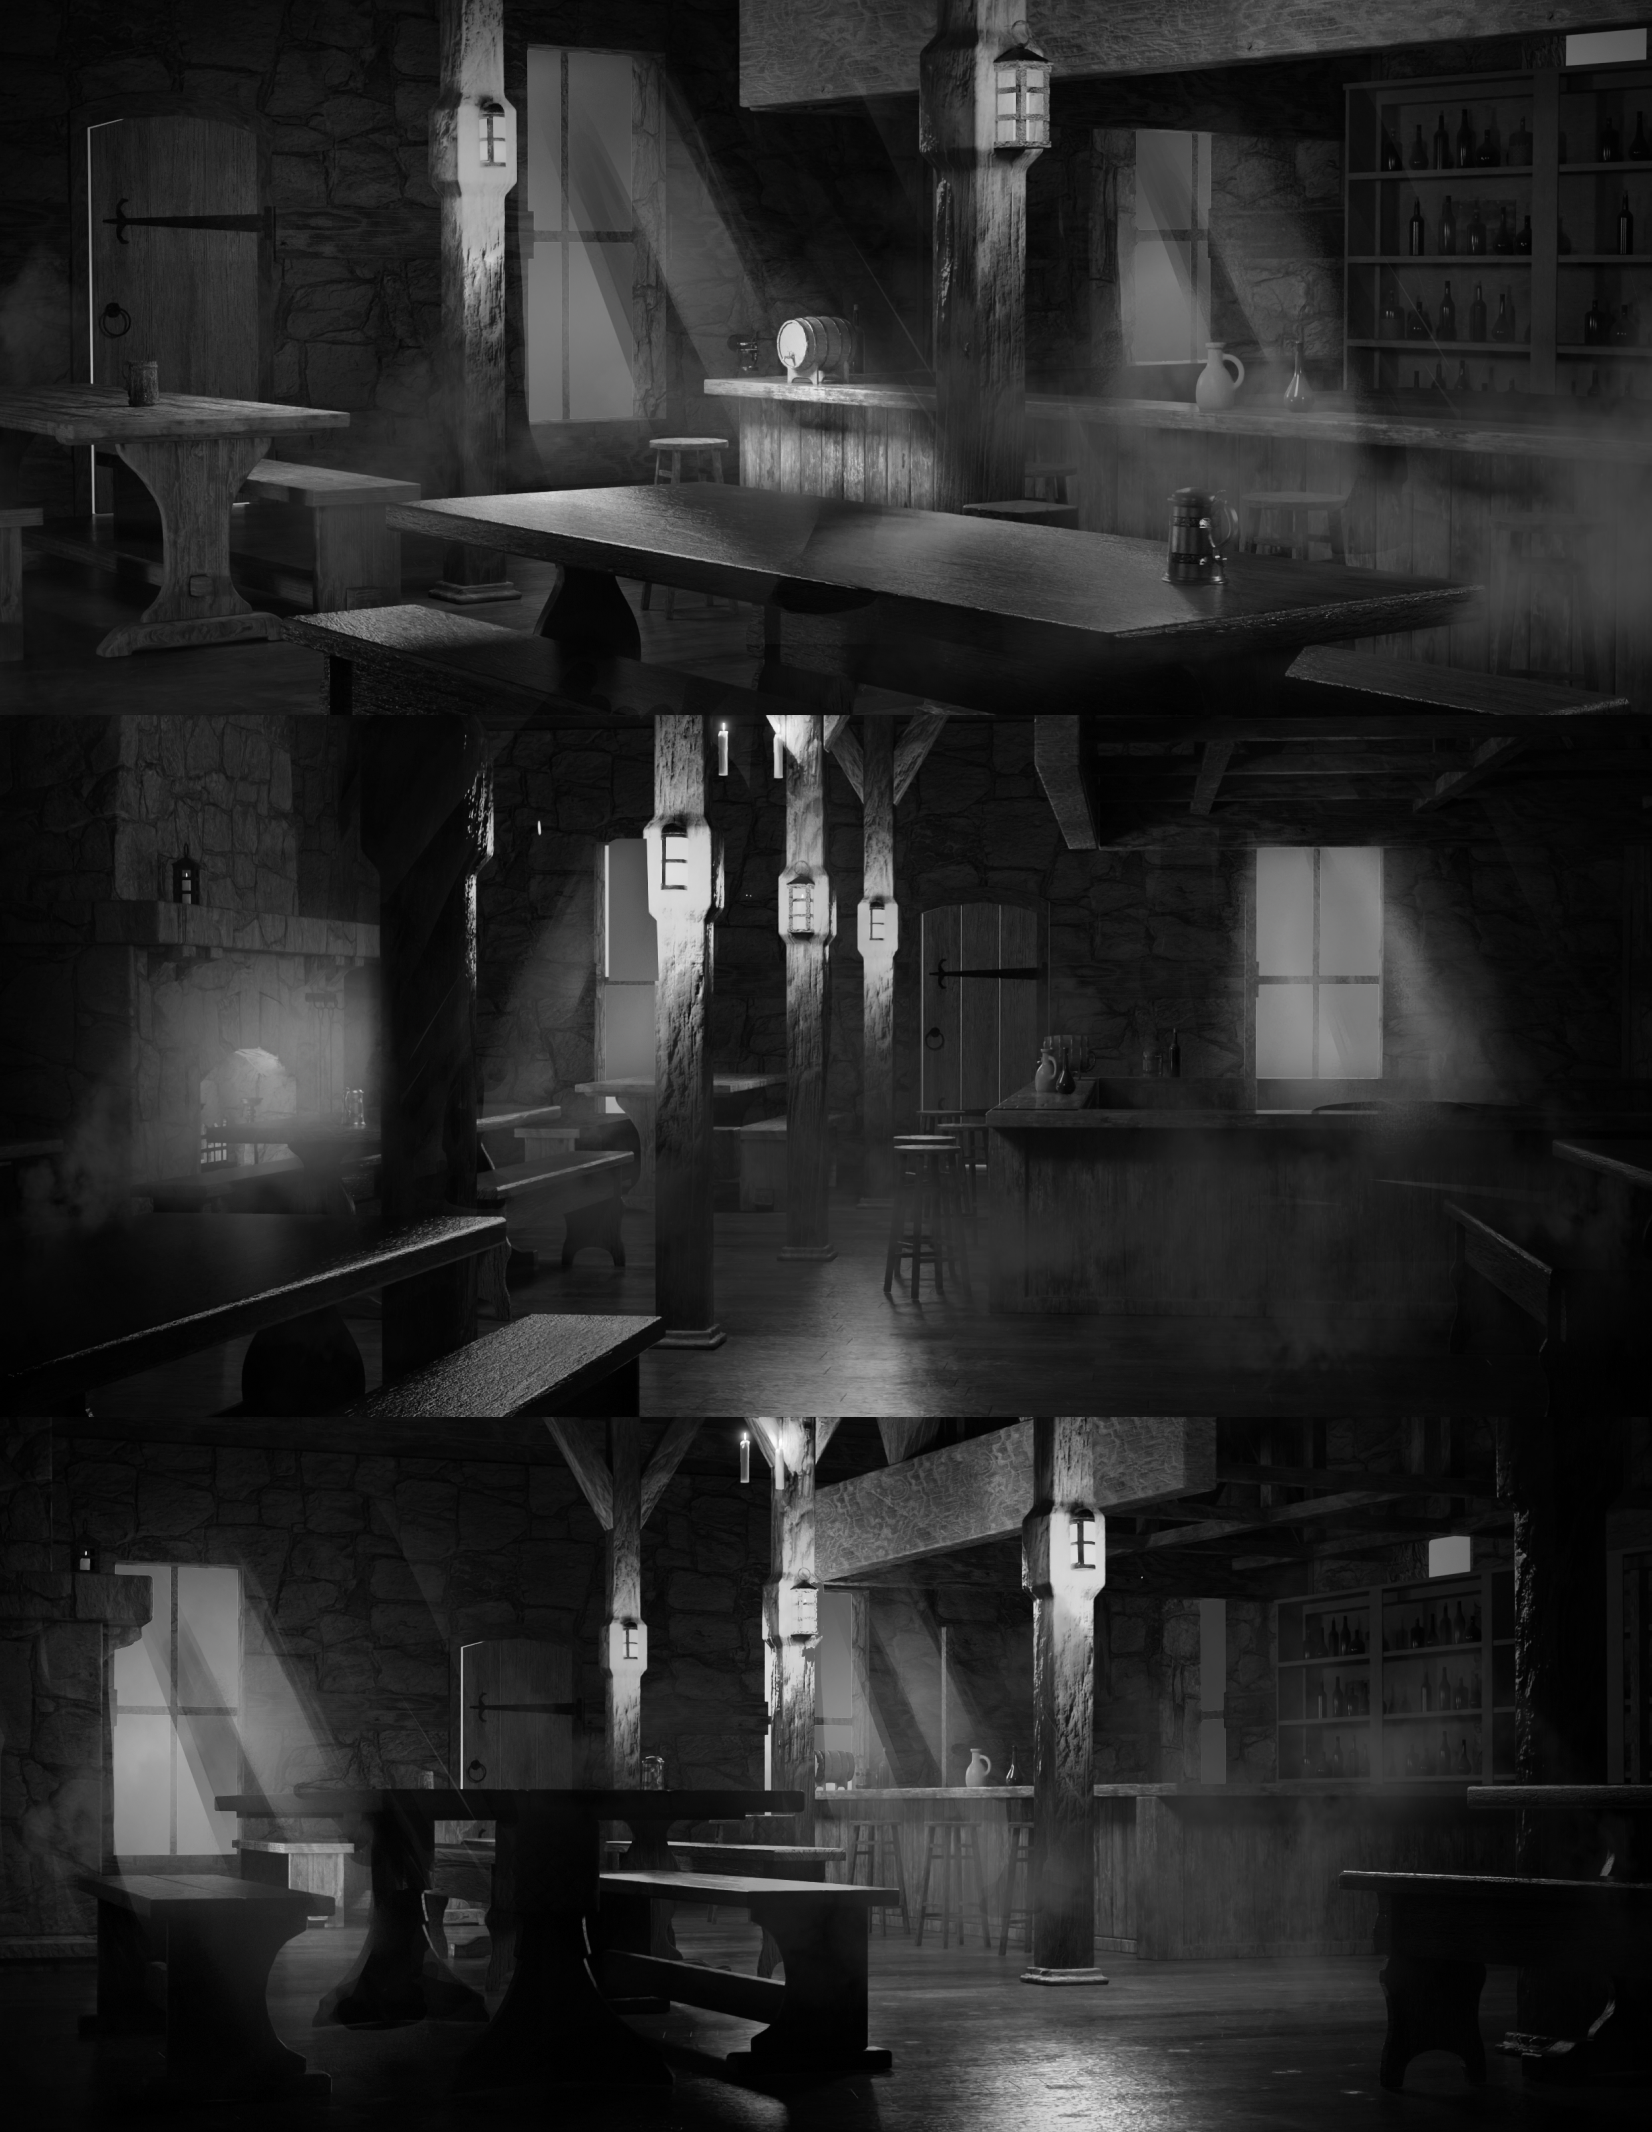
Finally, we arrived at the tavern—a place of warmth and safety. Here, our artistry transformed the environment into a welcoming haven, contrasting with the earlier darkness. Join us on this visual expedition as we unveil the artistry behind crafting these mesmerizing environments, each with its unique character and significance, all while keeping the dragon's hidden presence at the heart of the narrative.
Translating Concept Art to 3D Plans
Once our meticulously crafted concept art received the green light, we embarked on the next crucial step of our creative journey. This phase involved taking these stunning 2D visualizations and transforming them into intricate 3D plans, serving as invaluable blueprints for our team of skilled 3D artists.


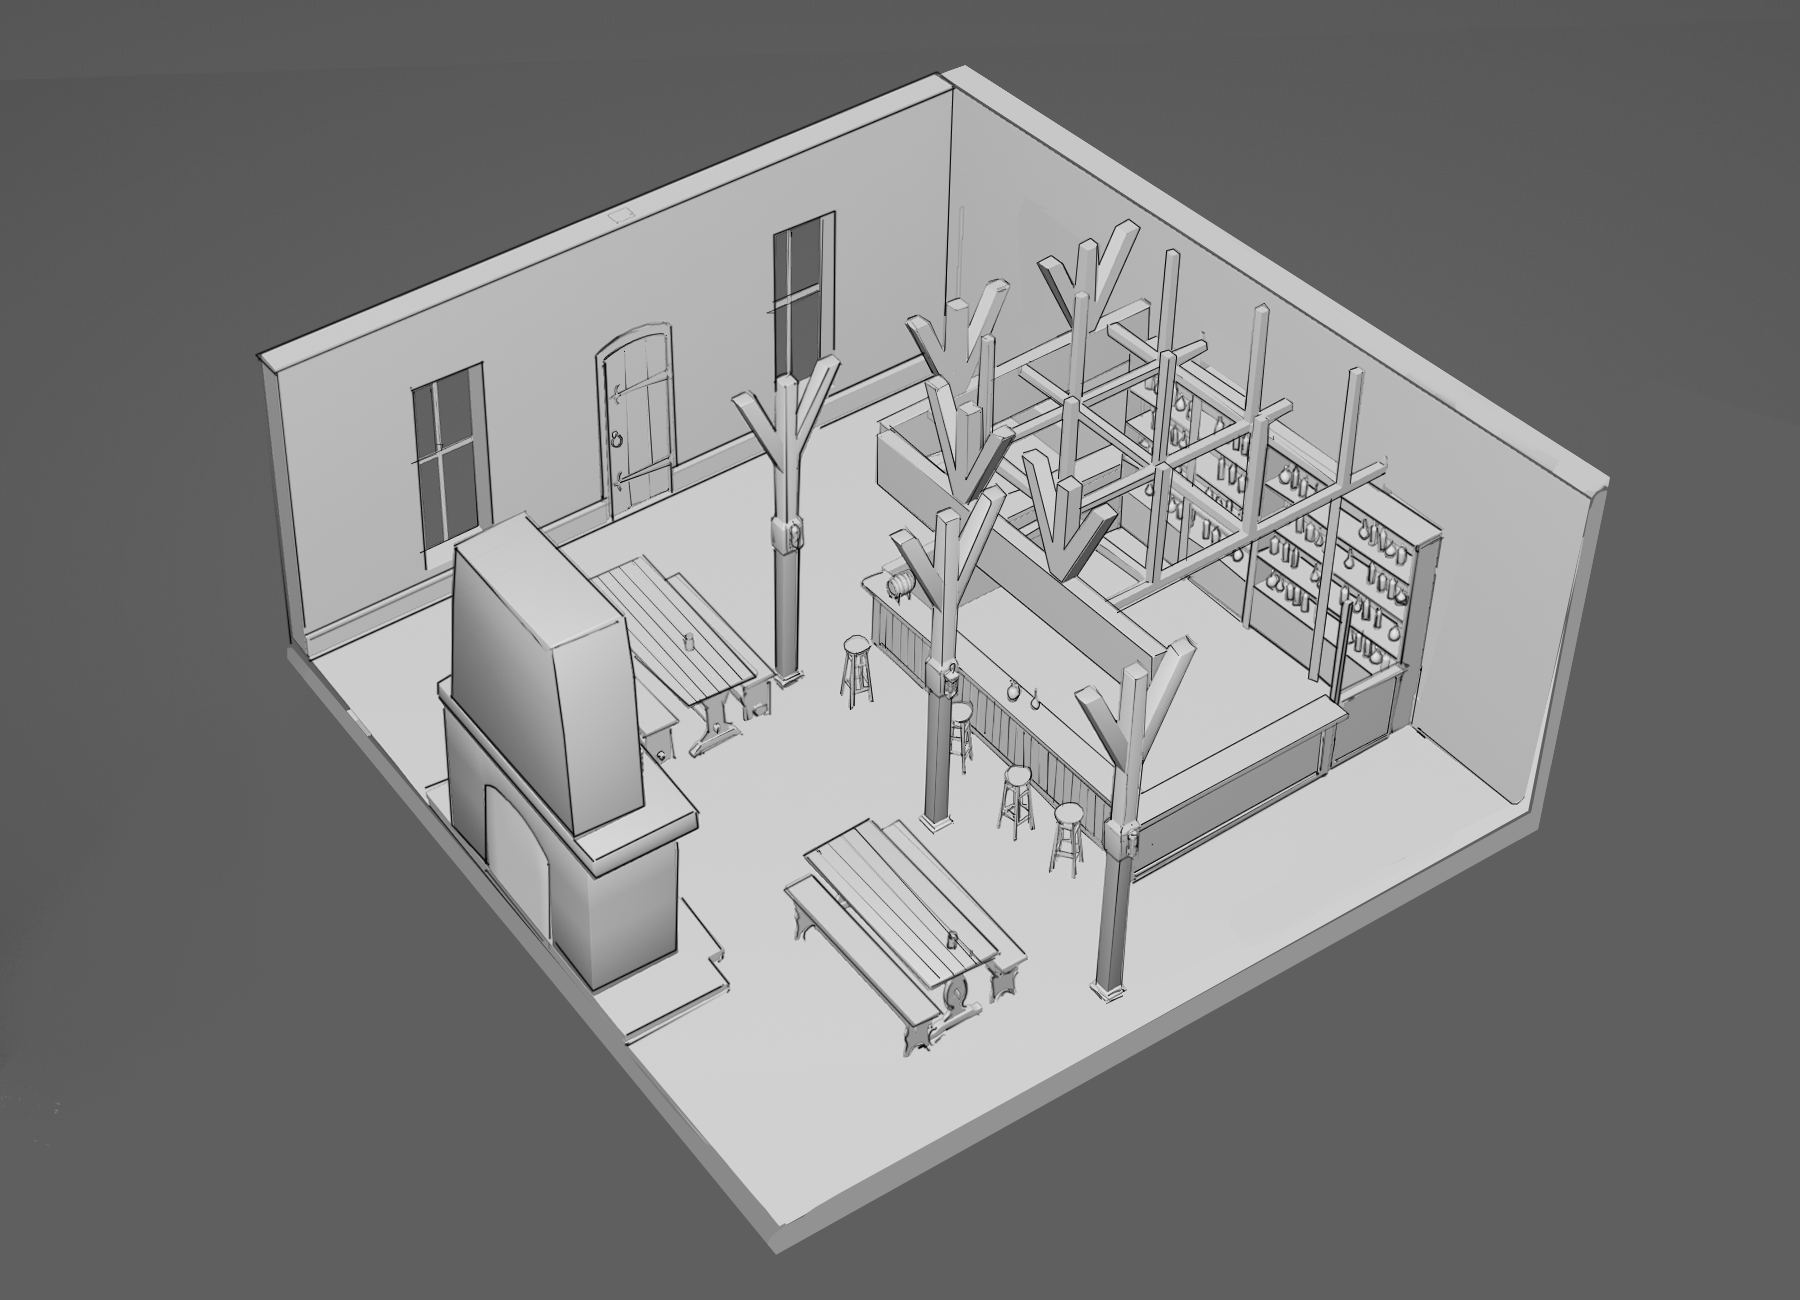
Each area, from the enchanting forest to the mysterious cave and the inviting tavern, had its dedicated concept, and our task was to breathe life into these concepts by translating them into three dimensions. These 3D plans played a pivotal role in guiding our artists as they meticulously sculpted, modelled, and textured the environments, ensuring that every detail matched the original artistic vision.


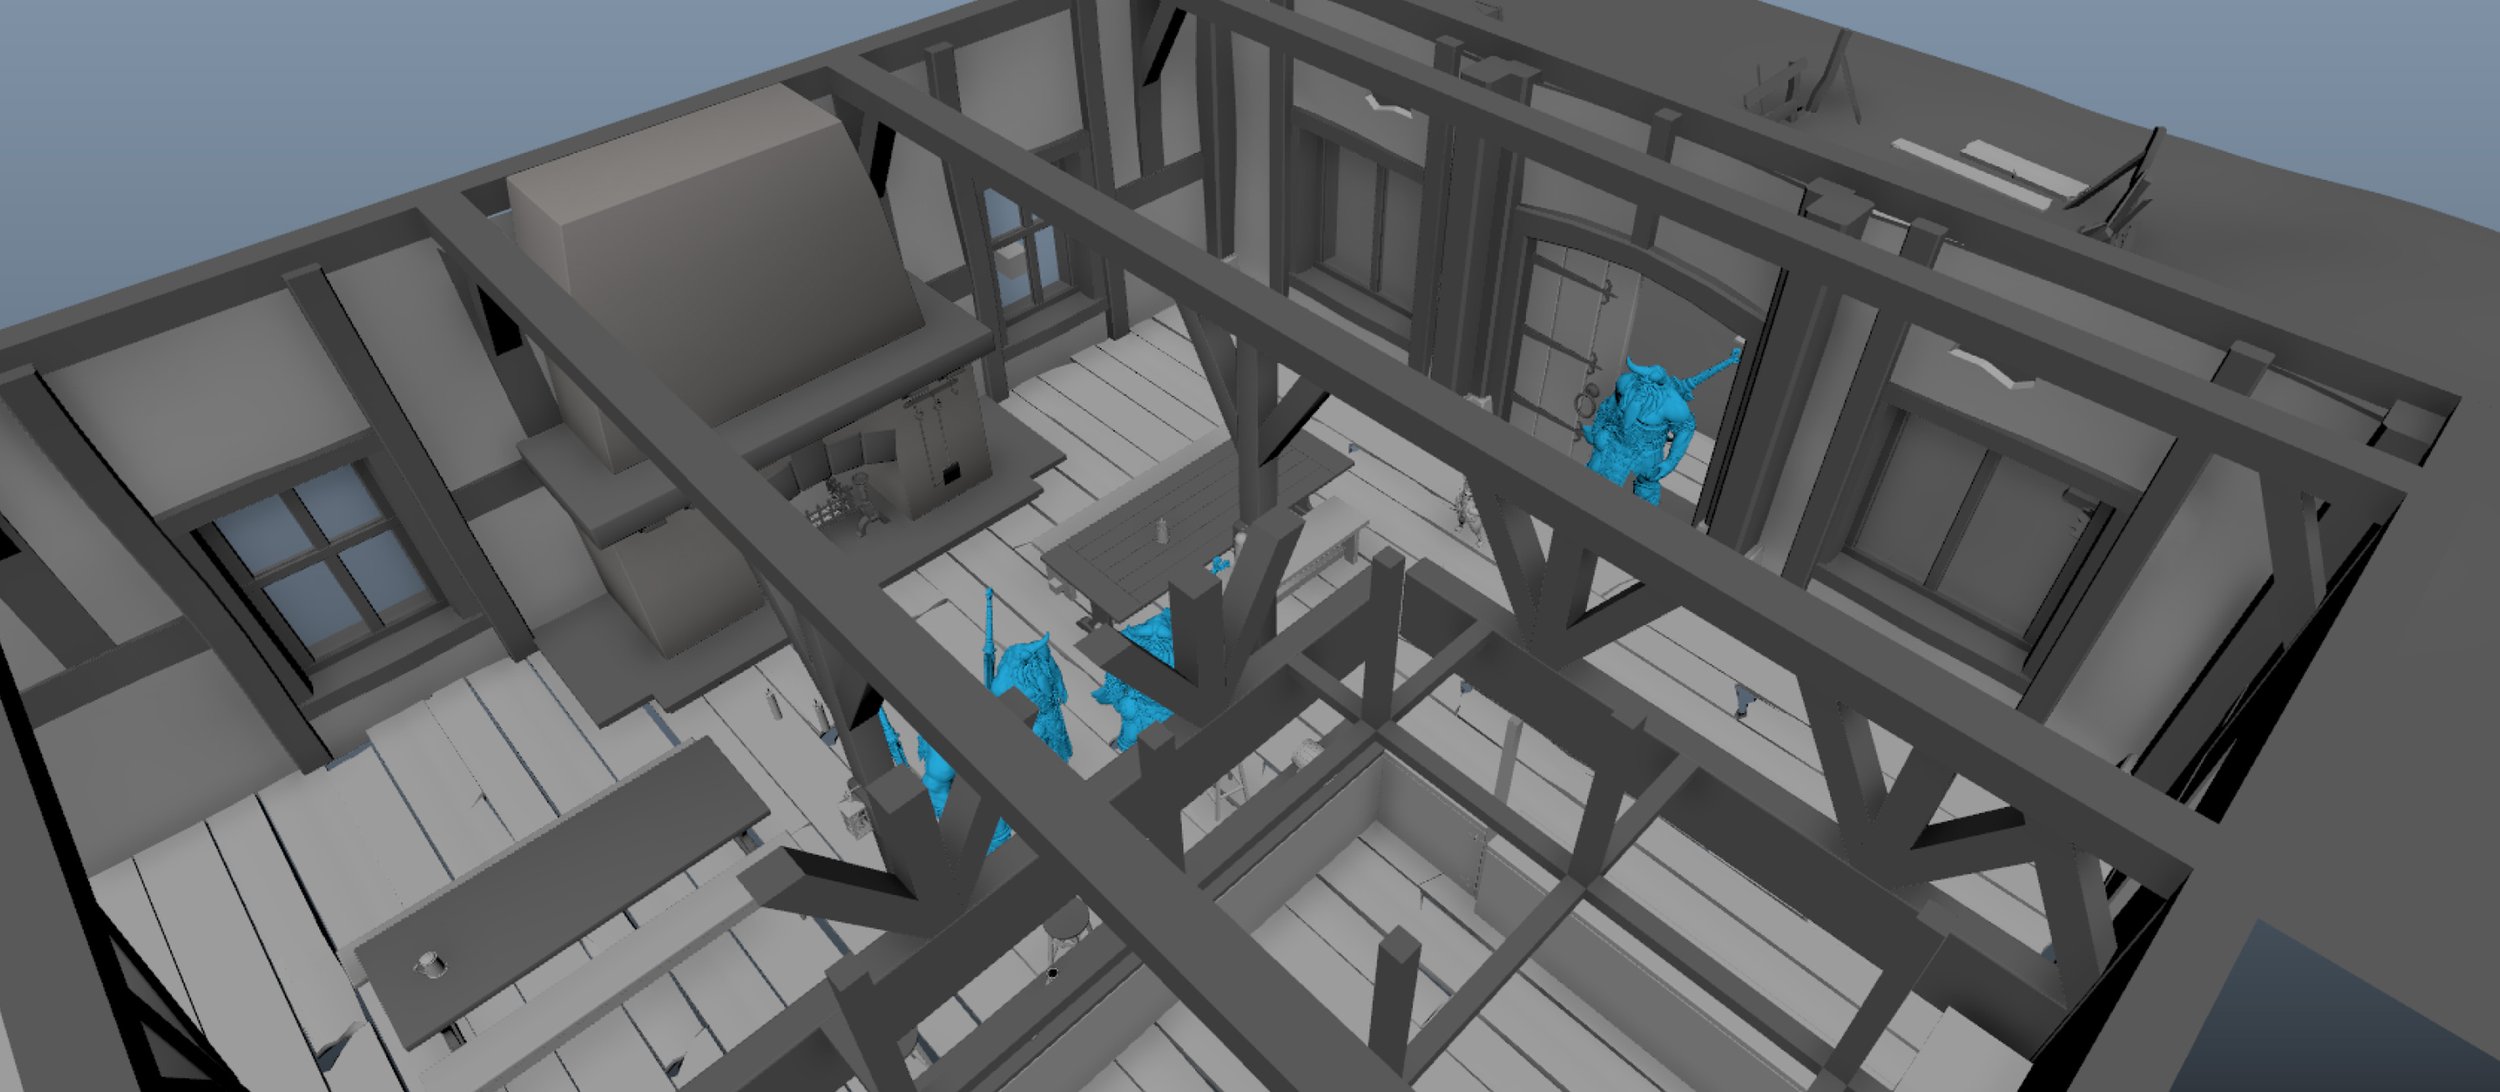
Armed with meticulously detailed 3D plans, we embarked on the journey of bringing various environments to life. Our goal was clear: construct sets that serve as the canvas for our pre-visualisation.
In this phase, we adhered to a deliberate strategy, shaping 3D models in larger block forms, avoiding intricate details. This approach let us focus on accurate environment shaping while striking a balance between creative vision and technical feasibility.
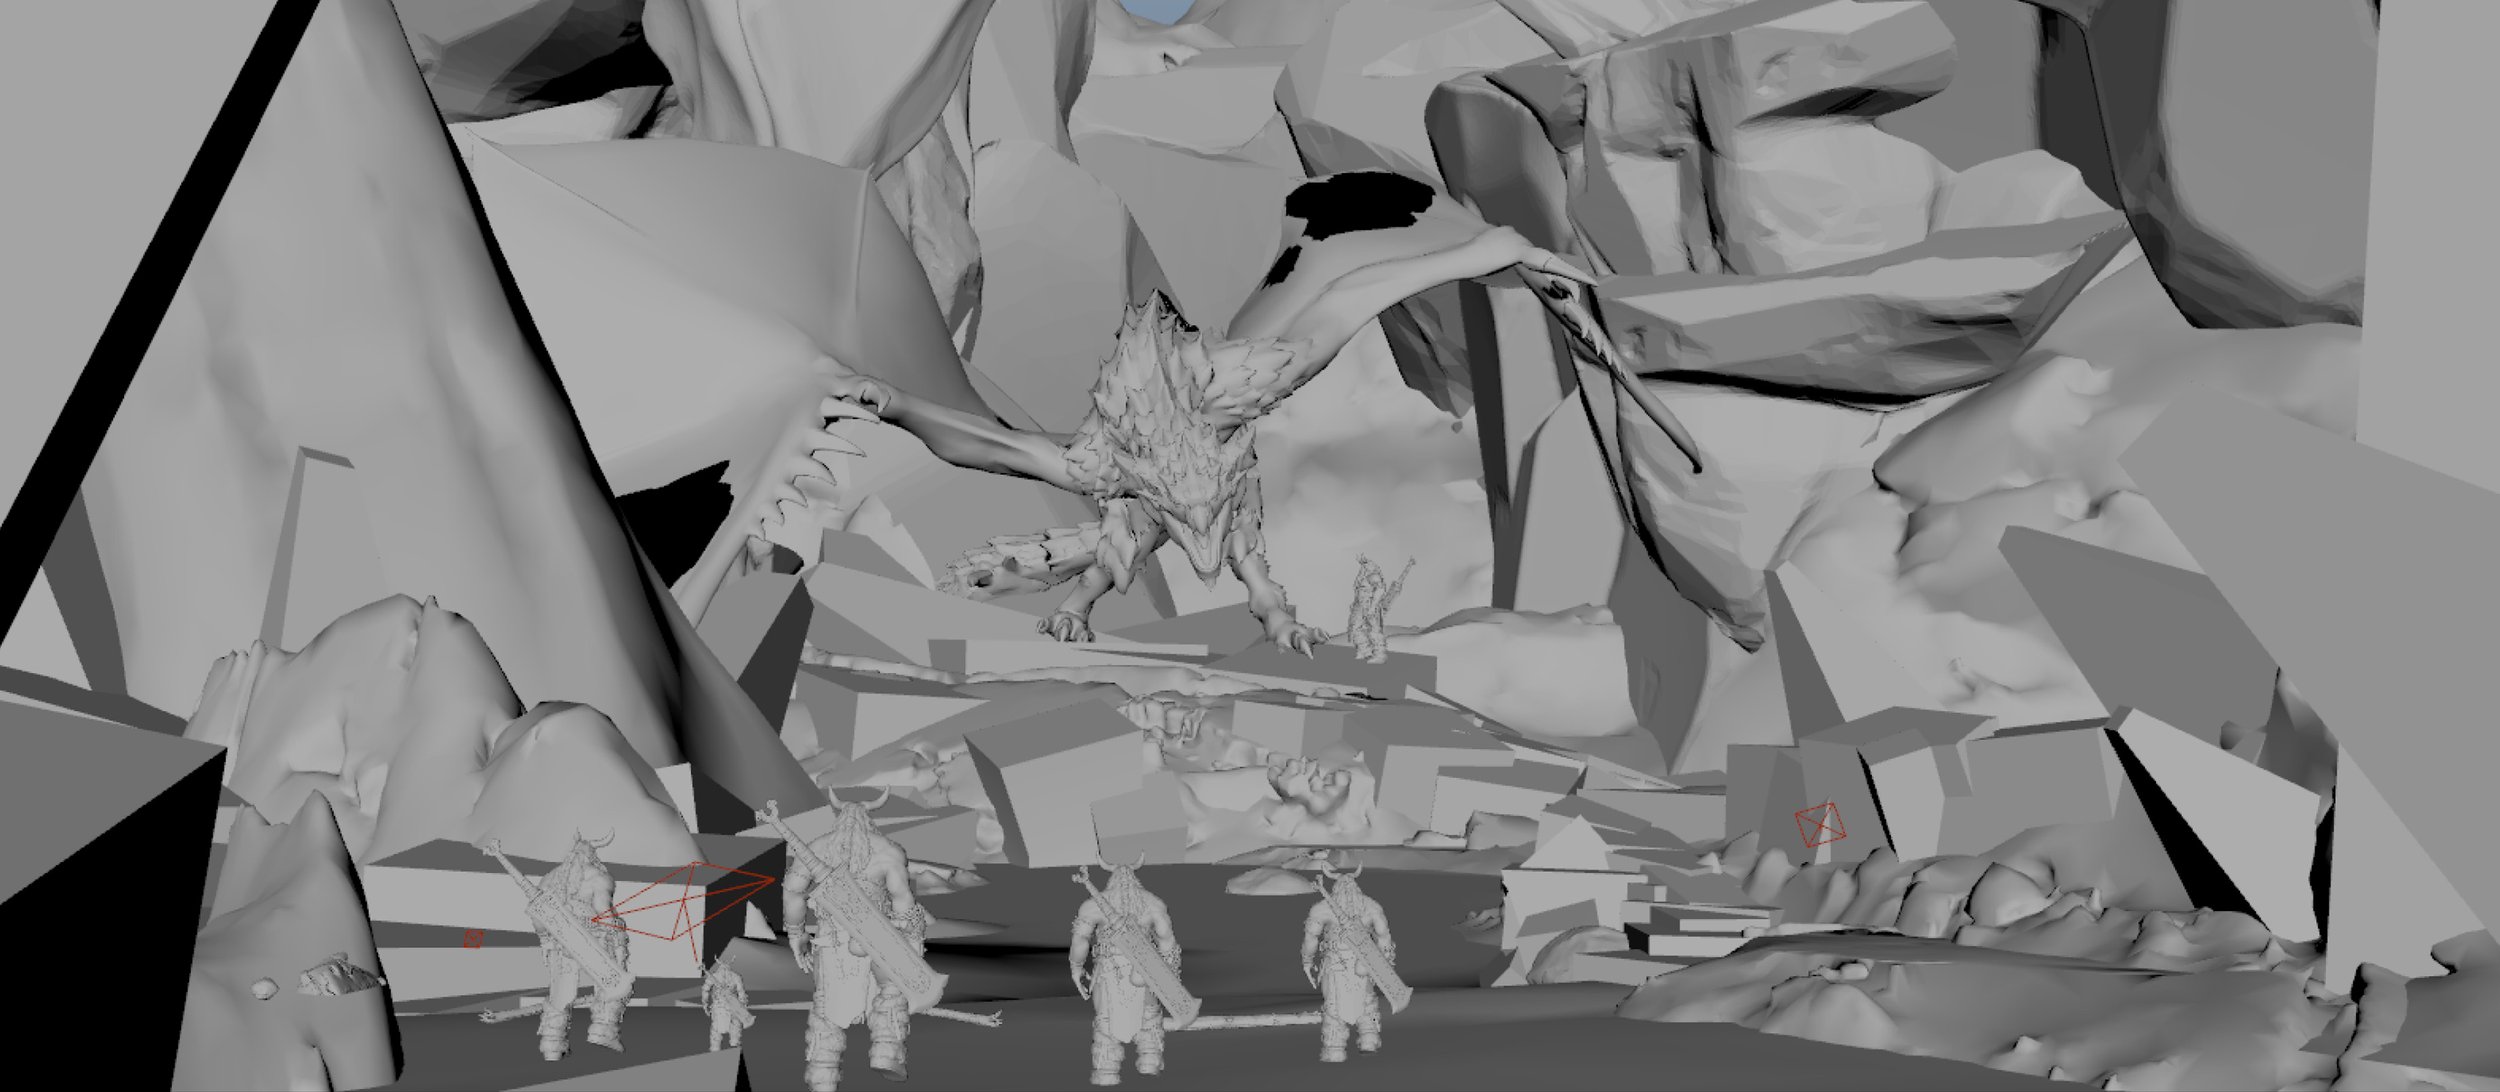
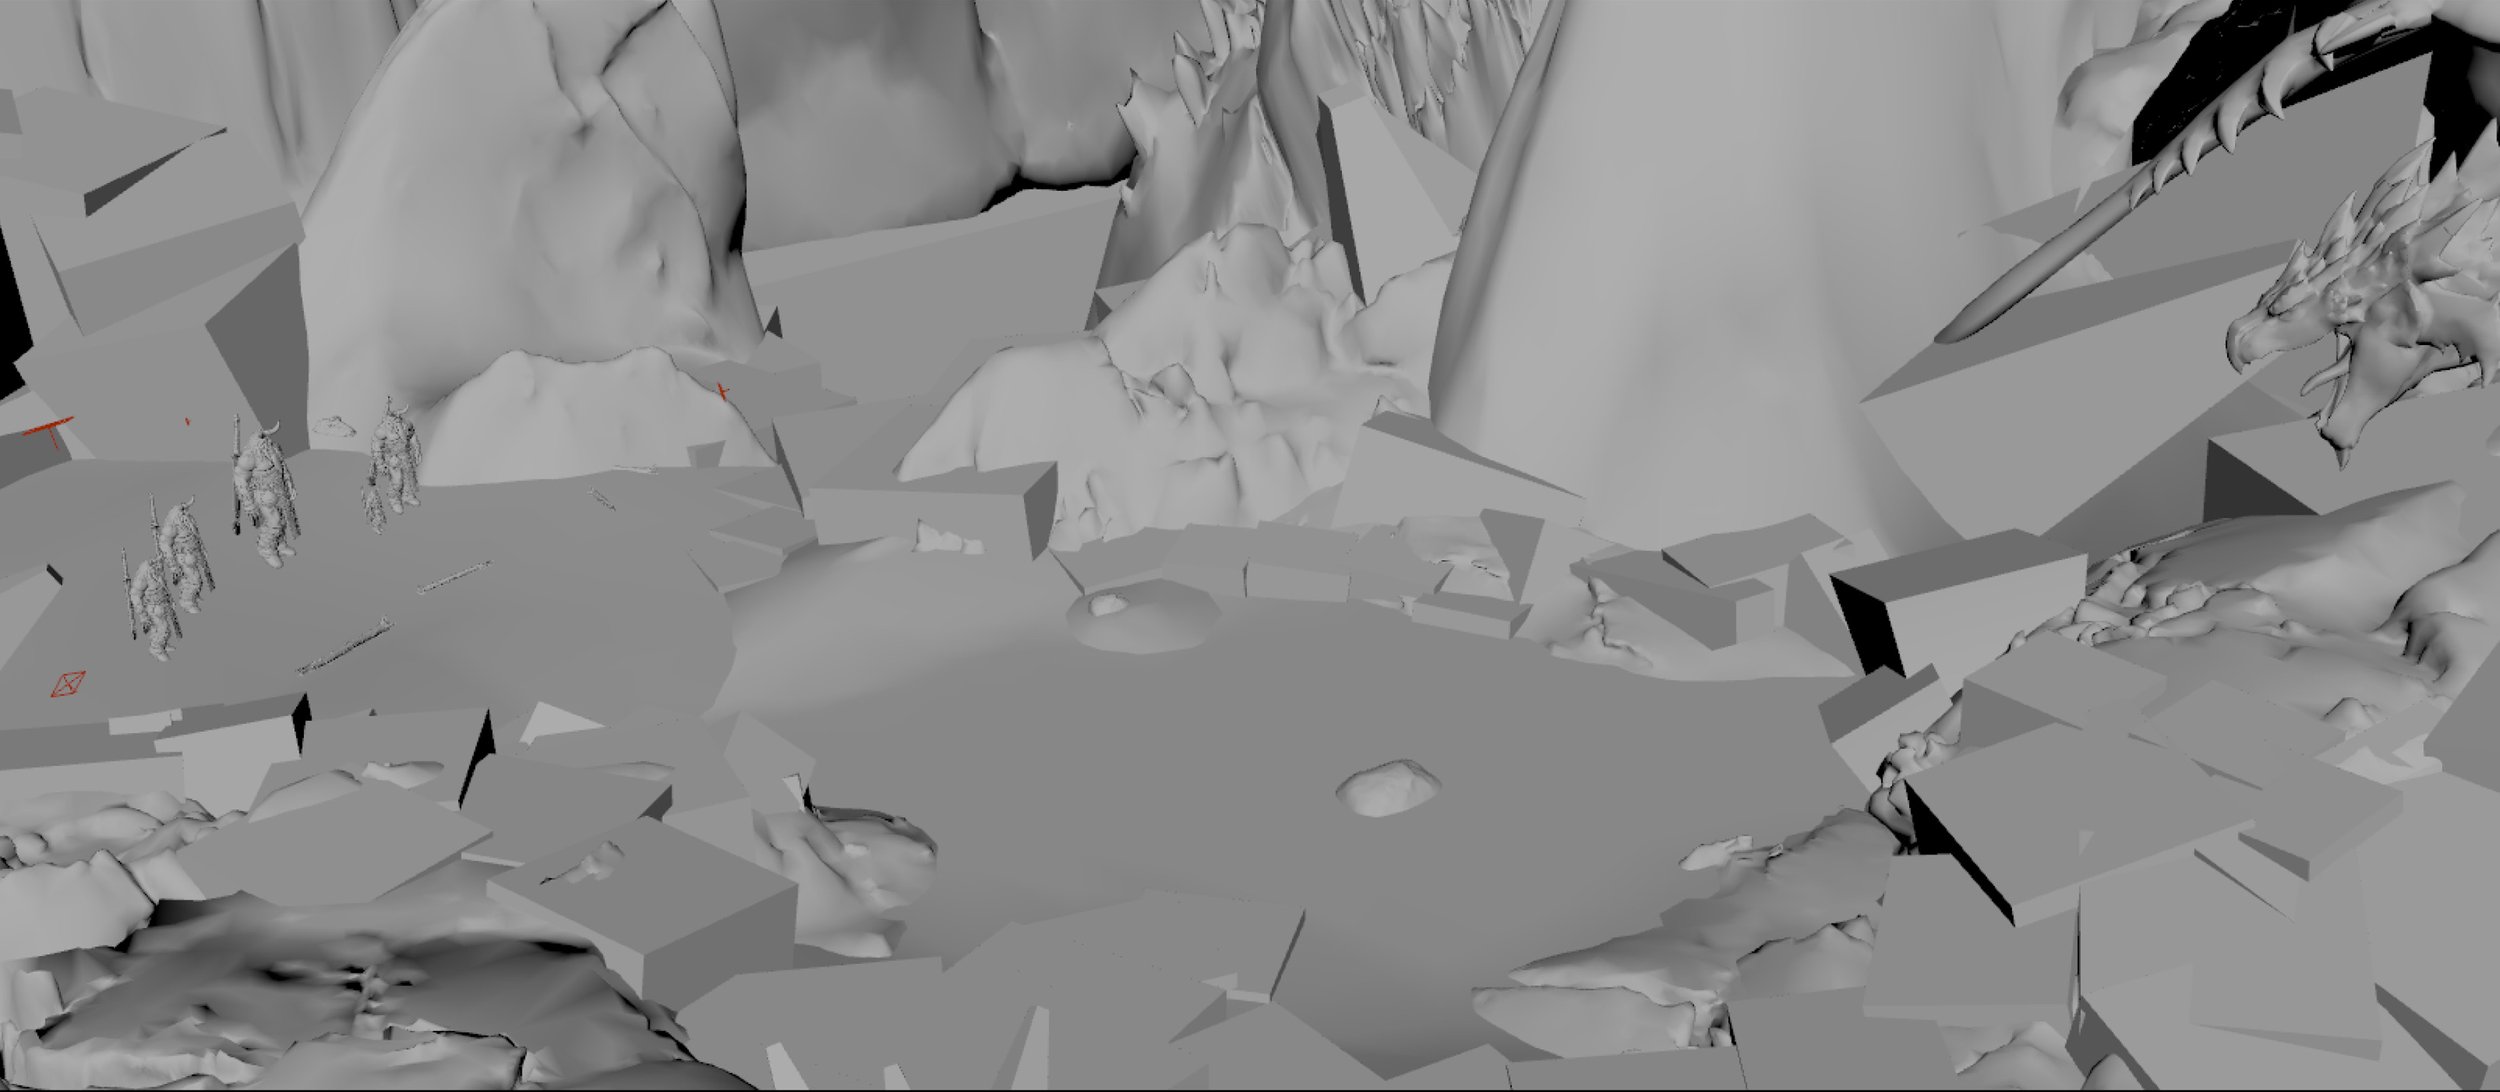
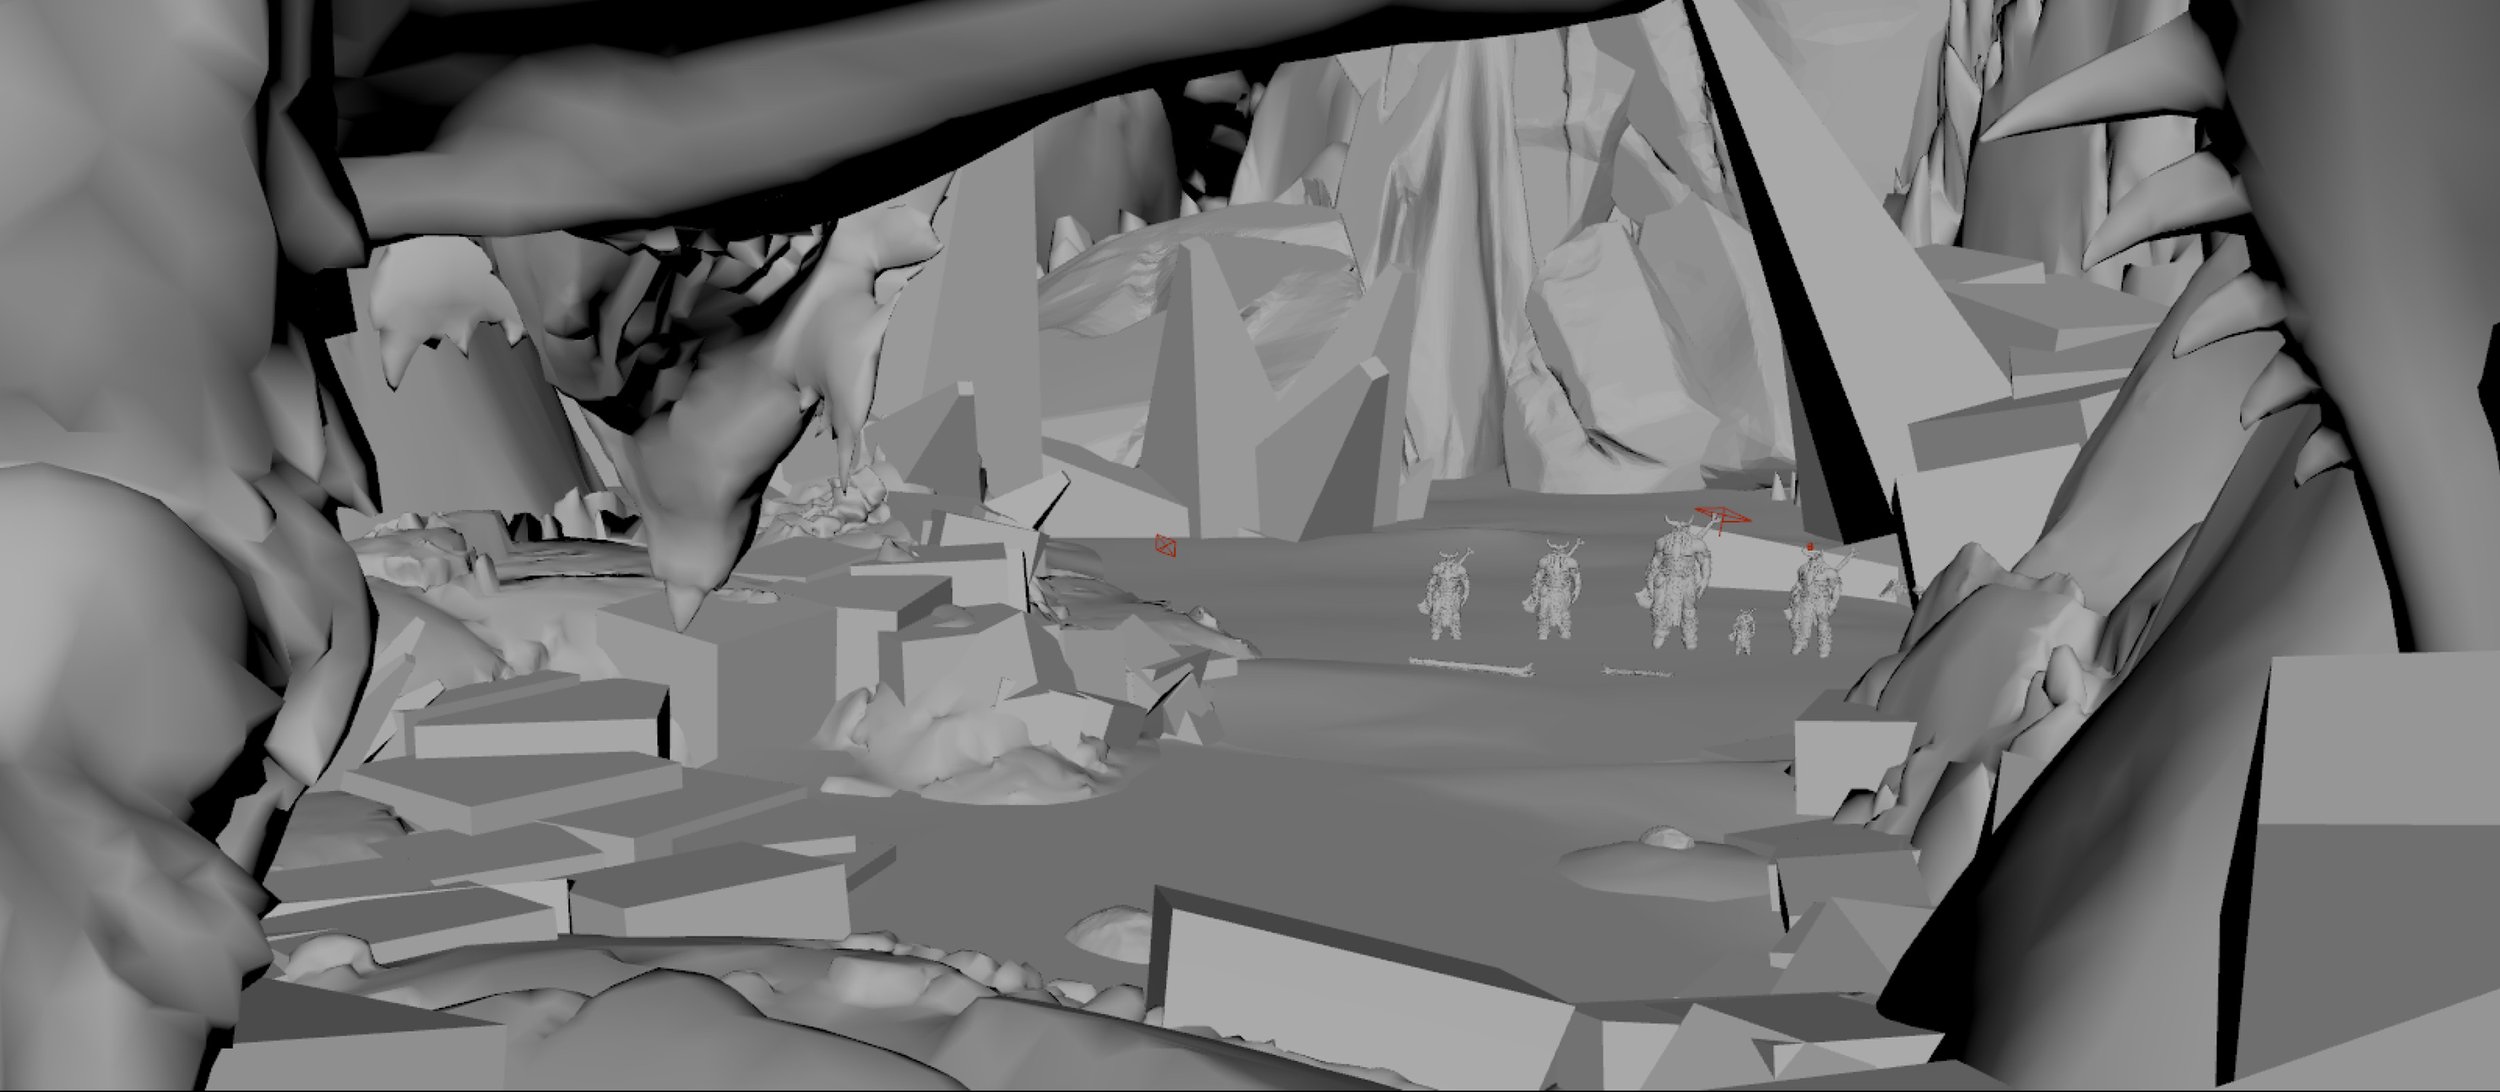

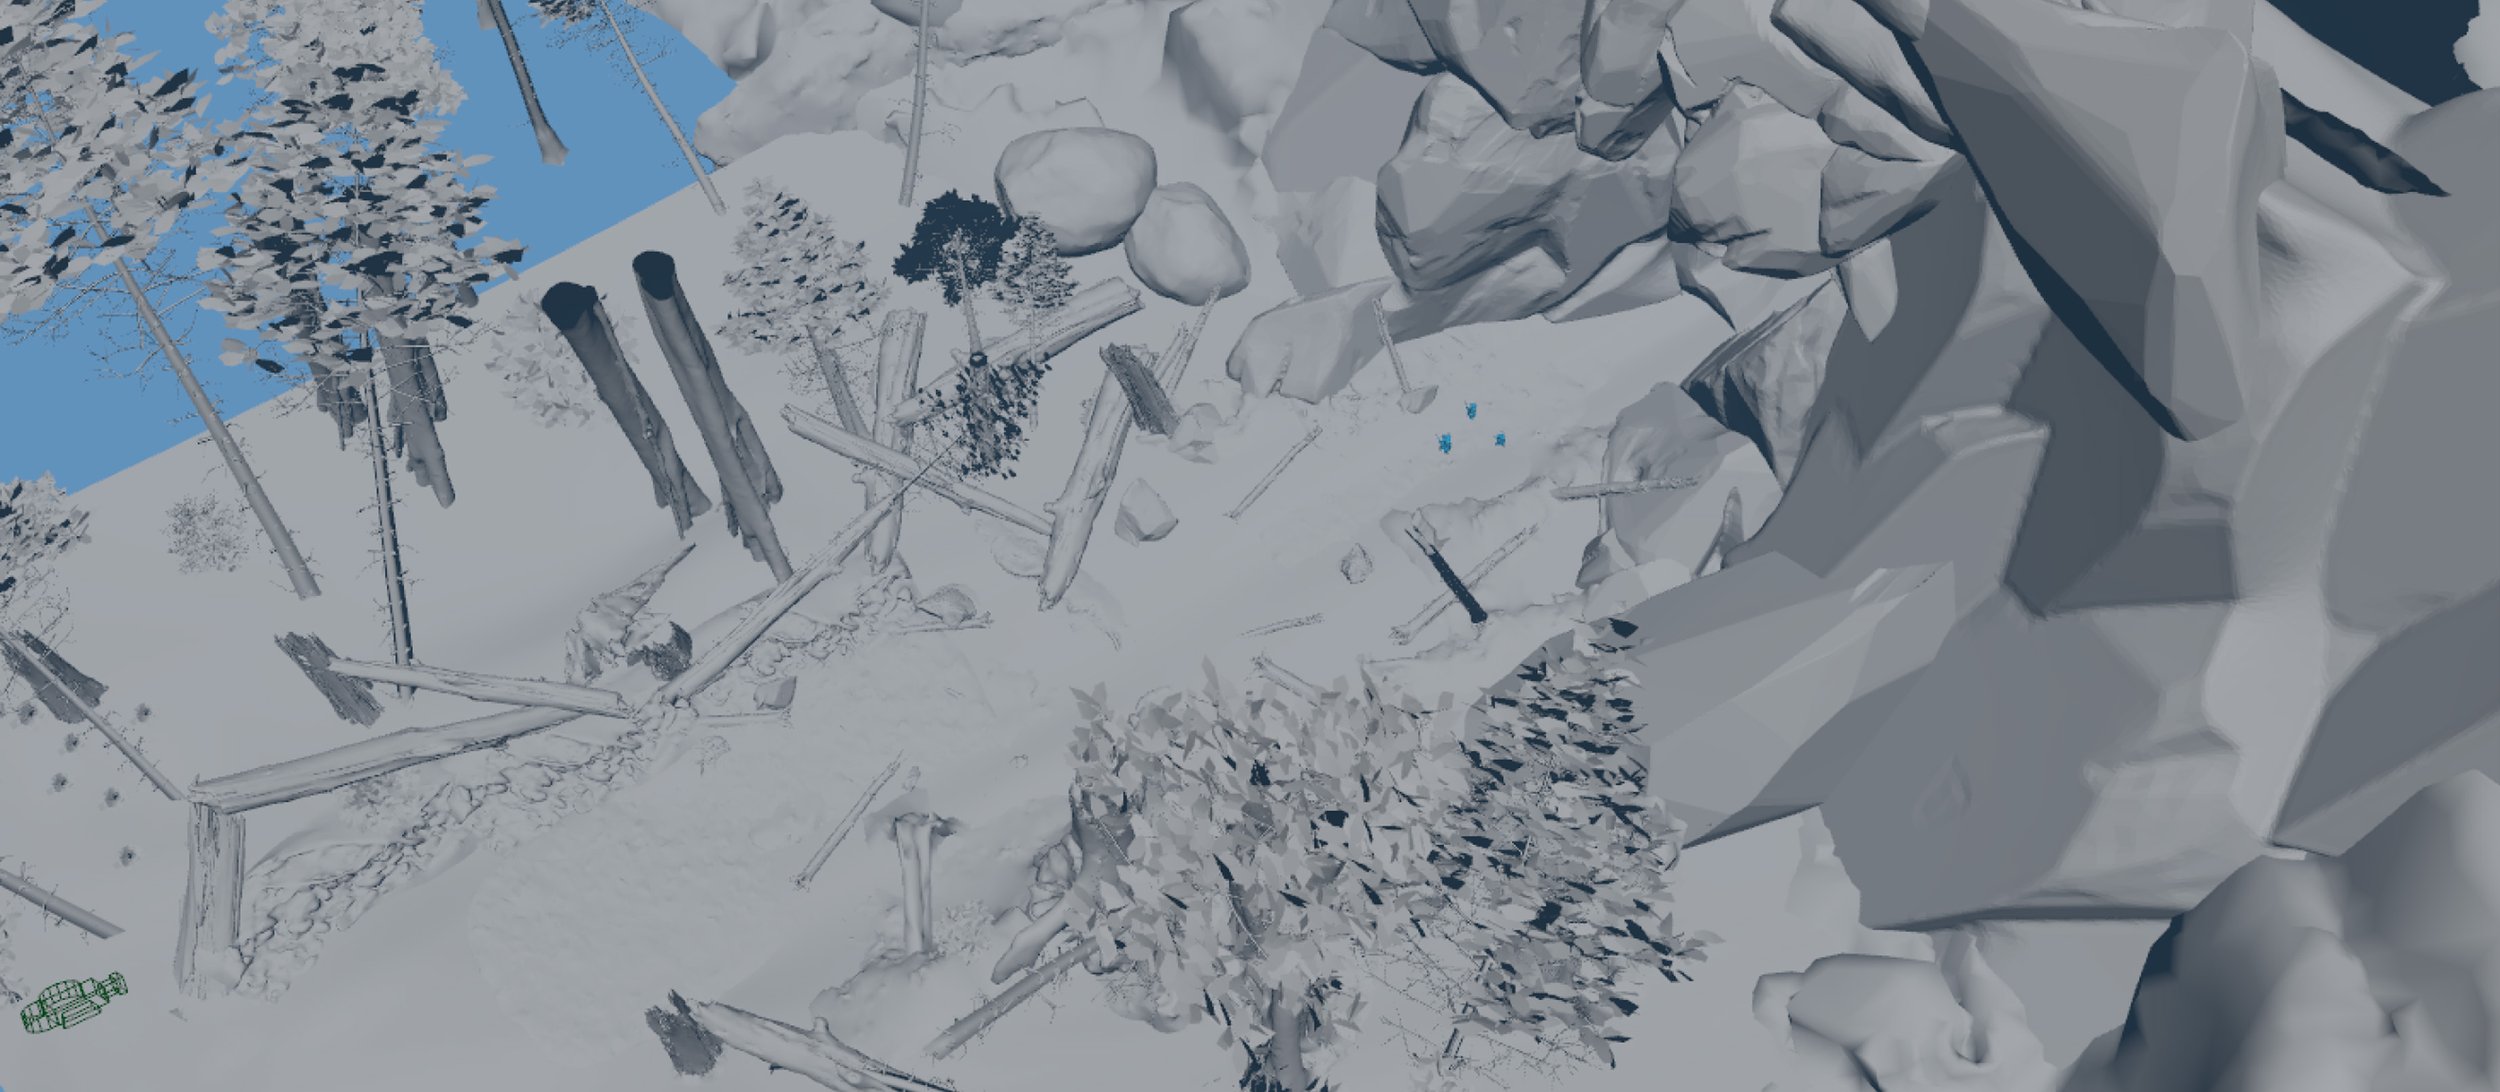
The next crucial step in our creative process involved testing the 3D scenes within Unreal Engine. Our primary objective was to assess the scale of everything meticulously. This evaluation allowed us to make any necessary adjustments before progressing into the pre-visualization stage.
One such test is showcased here—a glimpse into our assessment inside the cave. This test not only scrutinized the scale of the environment but also provided insights into the proportions of the Monster.
Preparing Characters for Previs
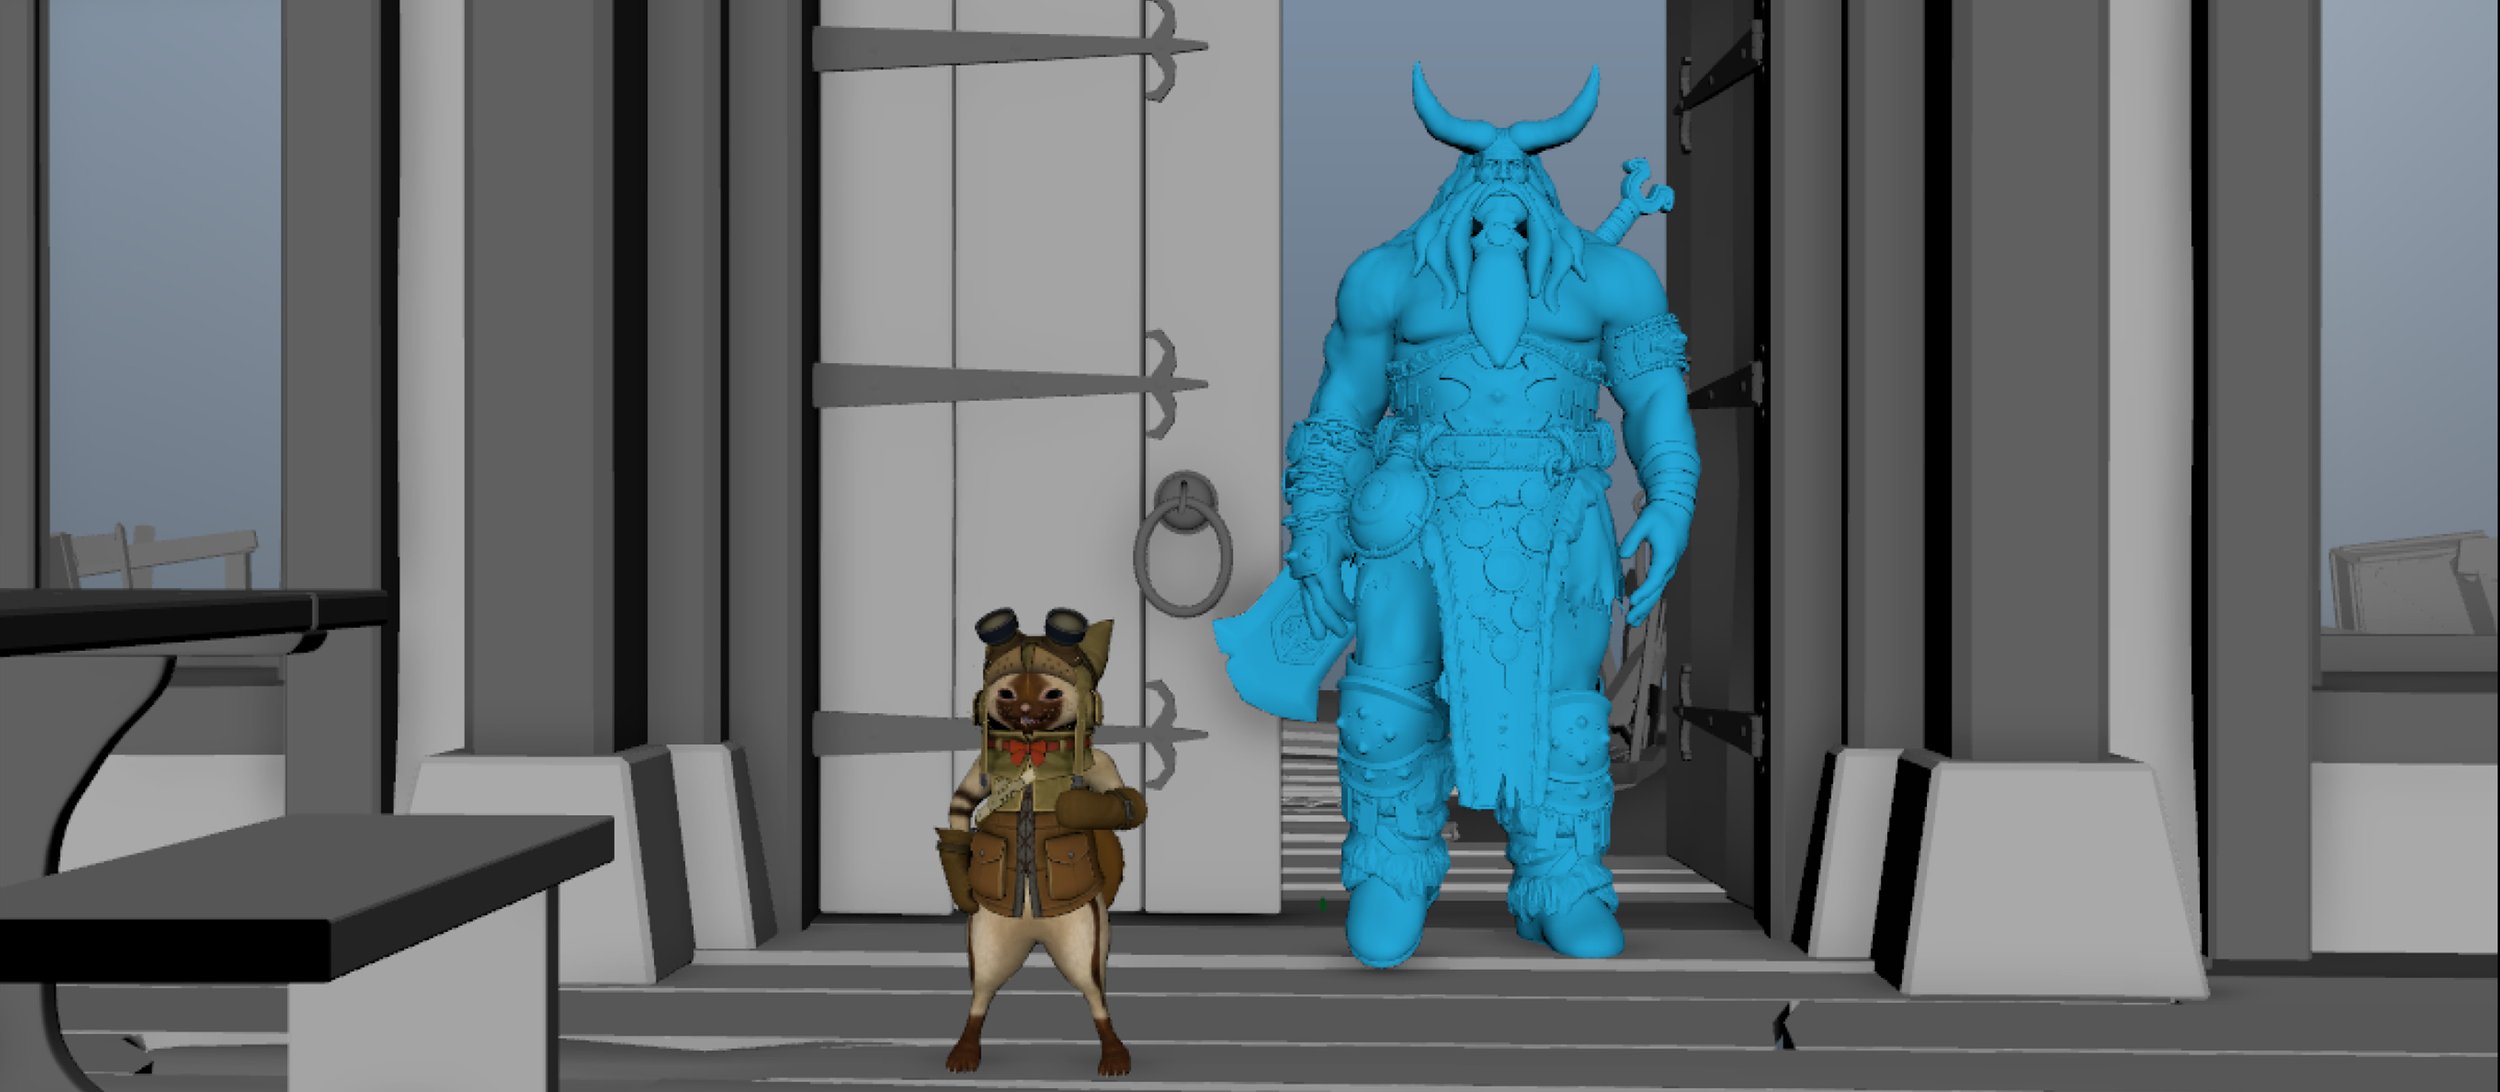
At this juncture, our attention turned to preparing the characters for the pre-visualisation (previs) stage. We were provided with character models from both Plarium and Capcom, with the exception of the Human Warrior. Instead of employing highly detailed character models for the previs stage, we opted for low-resolution meshes. These simplified representations were sufficient for framing shots in previs, as intricate details like facial controls were unnecessary. Our priority was to maintain fast and responsive scenes, enabling quick iterations.

Additionally, we needed to ensure that character scales harmonized within the shared world. This project marked the first time the Raid characters coexisted with the Monster Hunter counterparts.
Collaborating closely with everyone, we sought approval on character heights before integrating them into previs shots. This step proved vital, as previs revolves around composition and selecting the right shots to narrate the story. Altering character heights after the previs stage risked disrupting compositions and the storytelling flow.
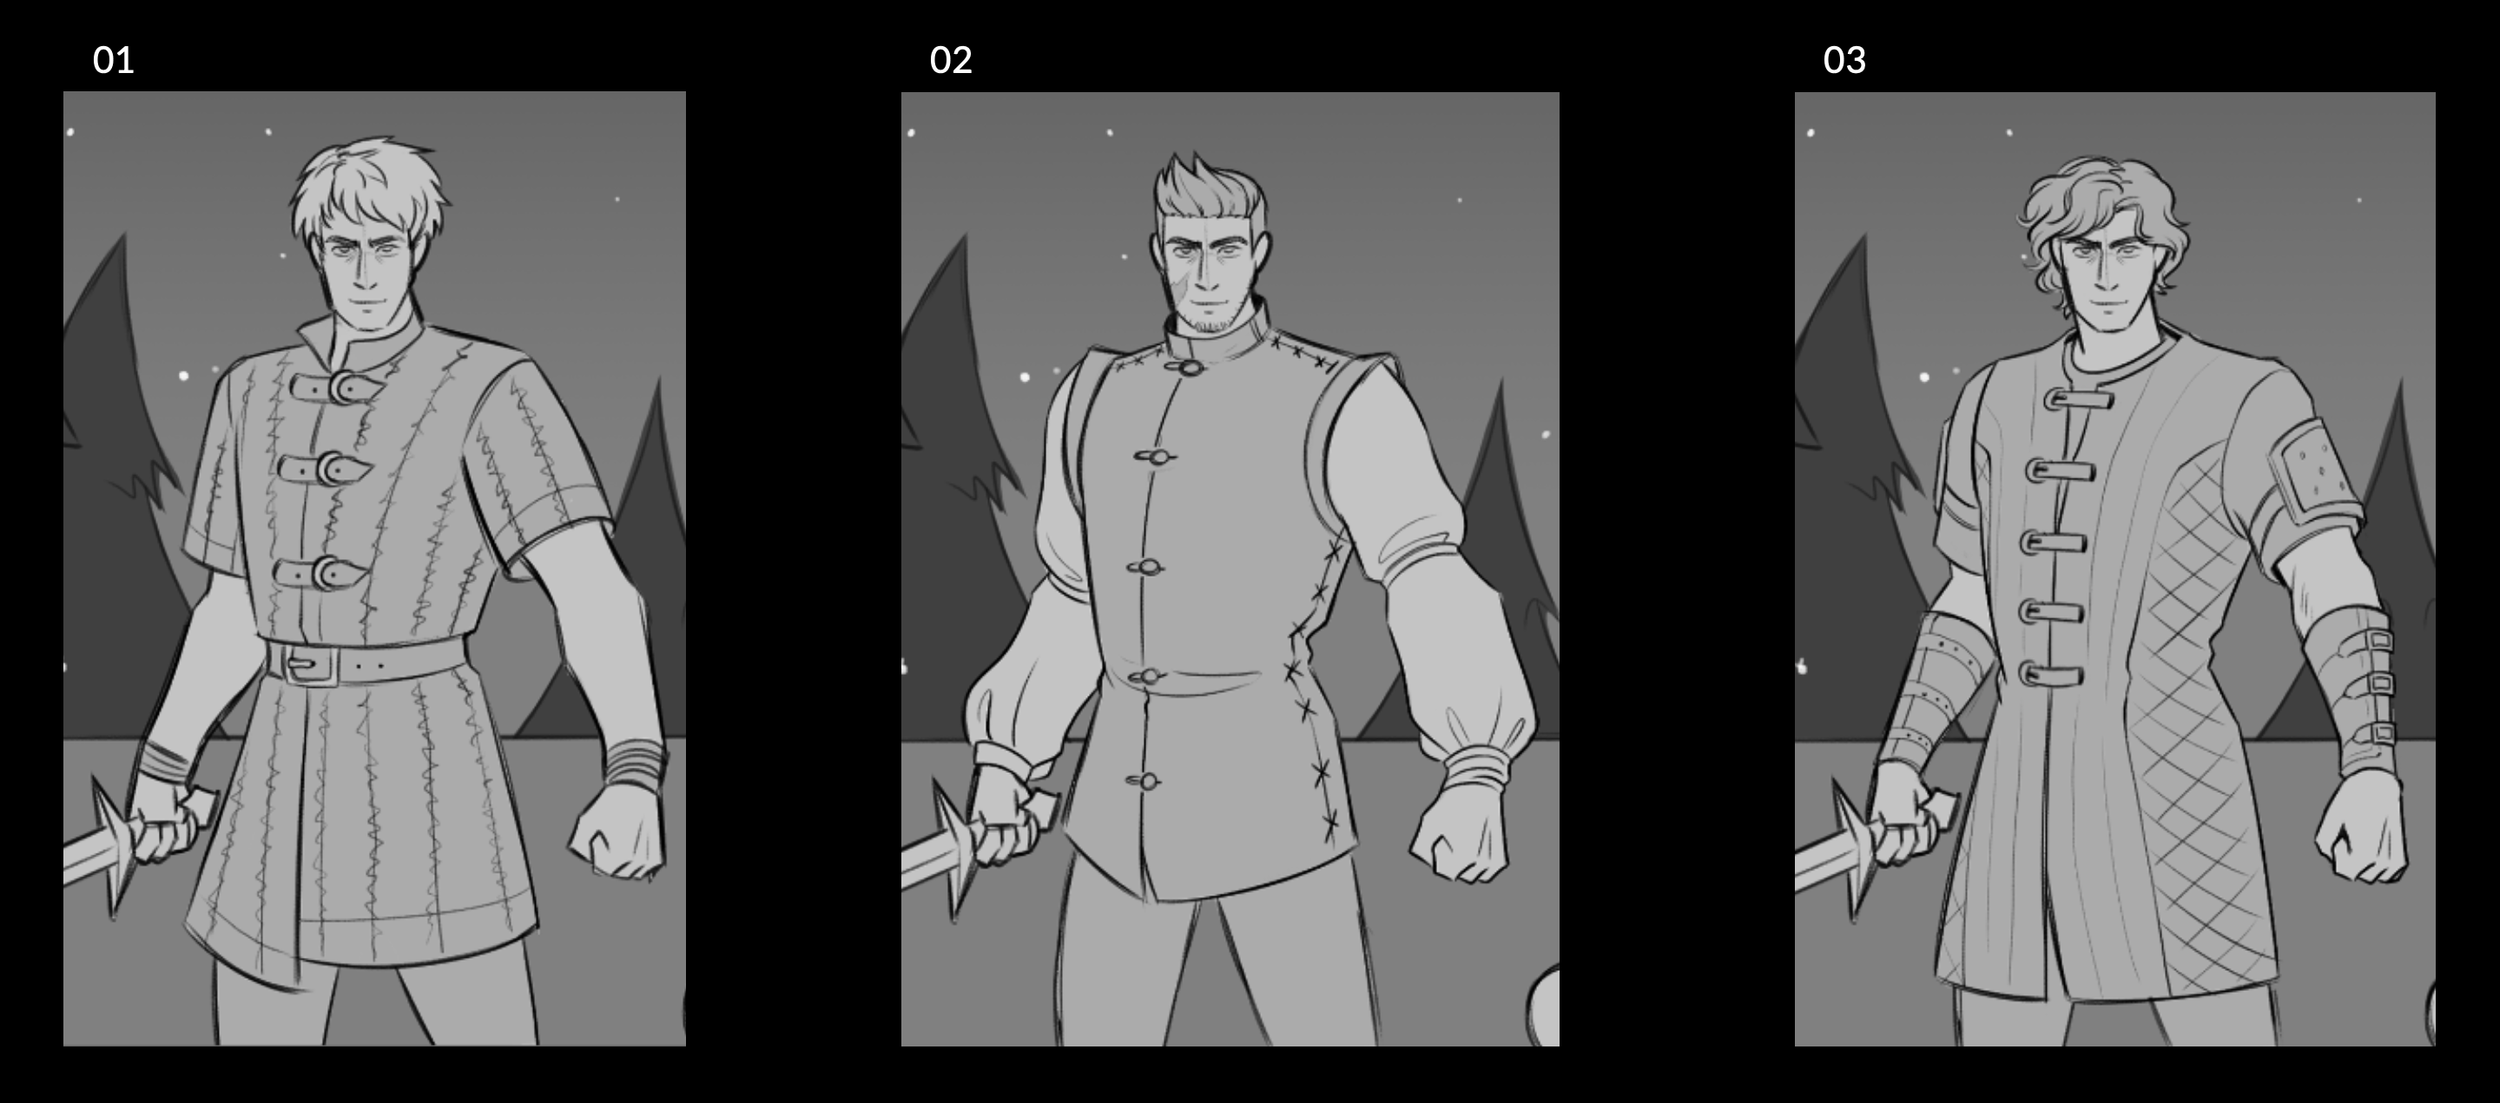
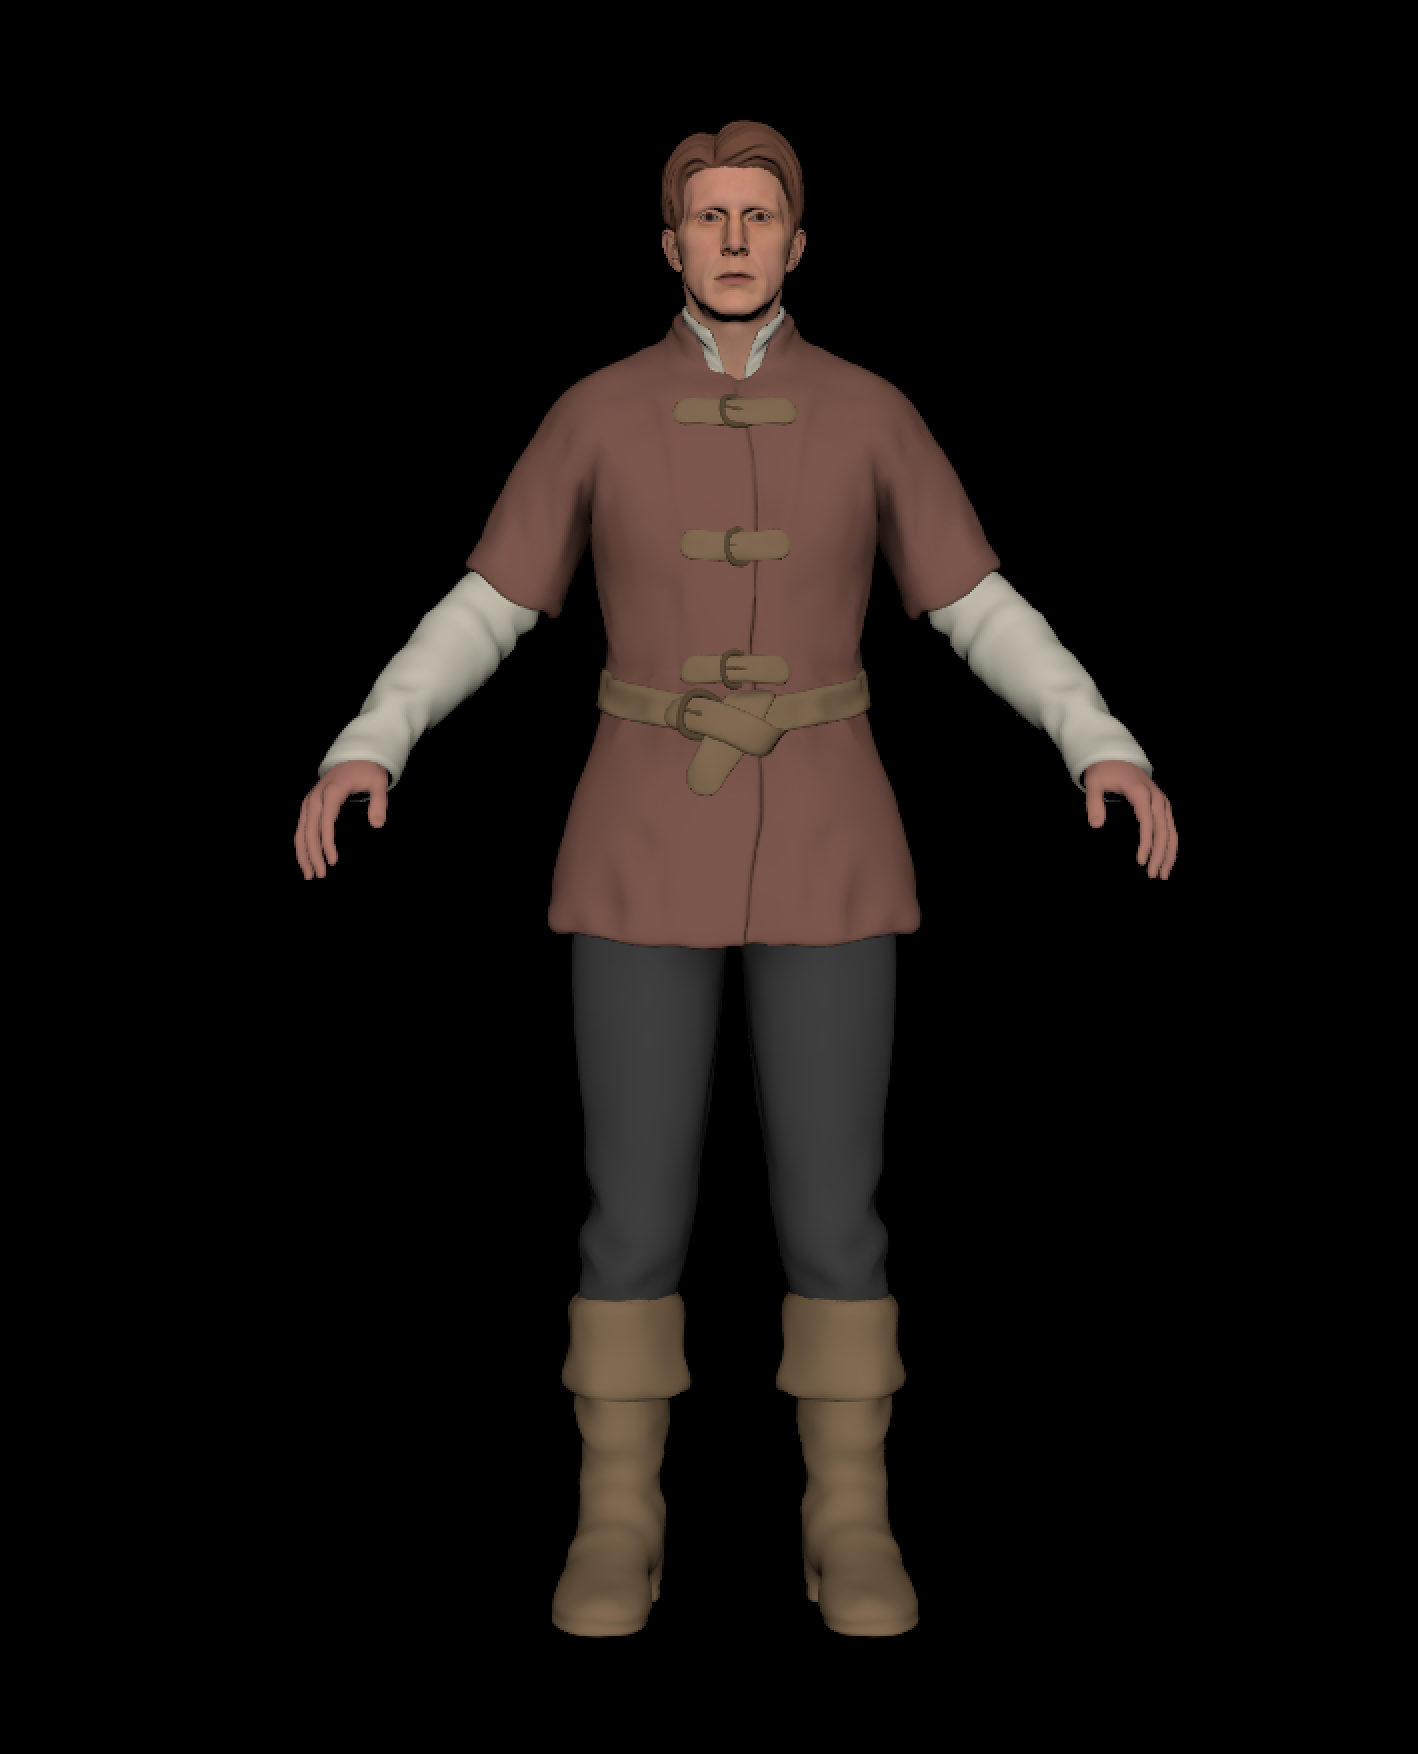
When it came to creating the Human Warrior, it's worth noting that we had to build this character from scratch for the project. To help form some direction for the character, Unobtainium shared three outfit designs with us, and the client ultimately favoured option 01. Given the project's focus on a more realistic cinematic style, we chose to use Unreal's MetaHuman for this character's creation. For previs purposes we quickly used this to create the previs version of the character based on the artwork provided which can be seen here.
The Pre-visualiSation Process
At Lunar Animation, we've always recognised the paramount importance of pre-visualisation (previs) in crafting cinematic excellence. It's a process deeply ingrained in our workflow, ensuring that our storytelling remains sharp and our action sequences are flawless.
Below you can watch the video of our finished previs, which is the result of our meticulous internal revisions and fine-tuning.
This stage allowed us to solidify the cinematic camera angles, ensuring they were just right. It also gave us the opportunity to address vital story concerns and readability issues, all without the need for character performances. A prime example of this is the axe that flies past the camera early in the story, a detail not present in the storyboards. This addition serves as a clever introduction to the Human character while subtly conveying his determination to continue the battle inside the cave, deftly communicating his allegiance without the need for verbal exposition."
Character Setup in Unreal Engine
In the pivotal stage of preparing our characters for animation and integrating them into Unreal Engine, our focus honed in on the creation of the Human character. However, we took a unique approach by basing the character on a realistic human 3D scan from TEN24, rather than starting from one of the default MetaHuman options. This decision allowed us to craft a character with a distinct appearance while maintaining proportions closely resembling those of a real person. The result was a character that added a level of authenticity and uniqueness to the project.

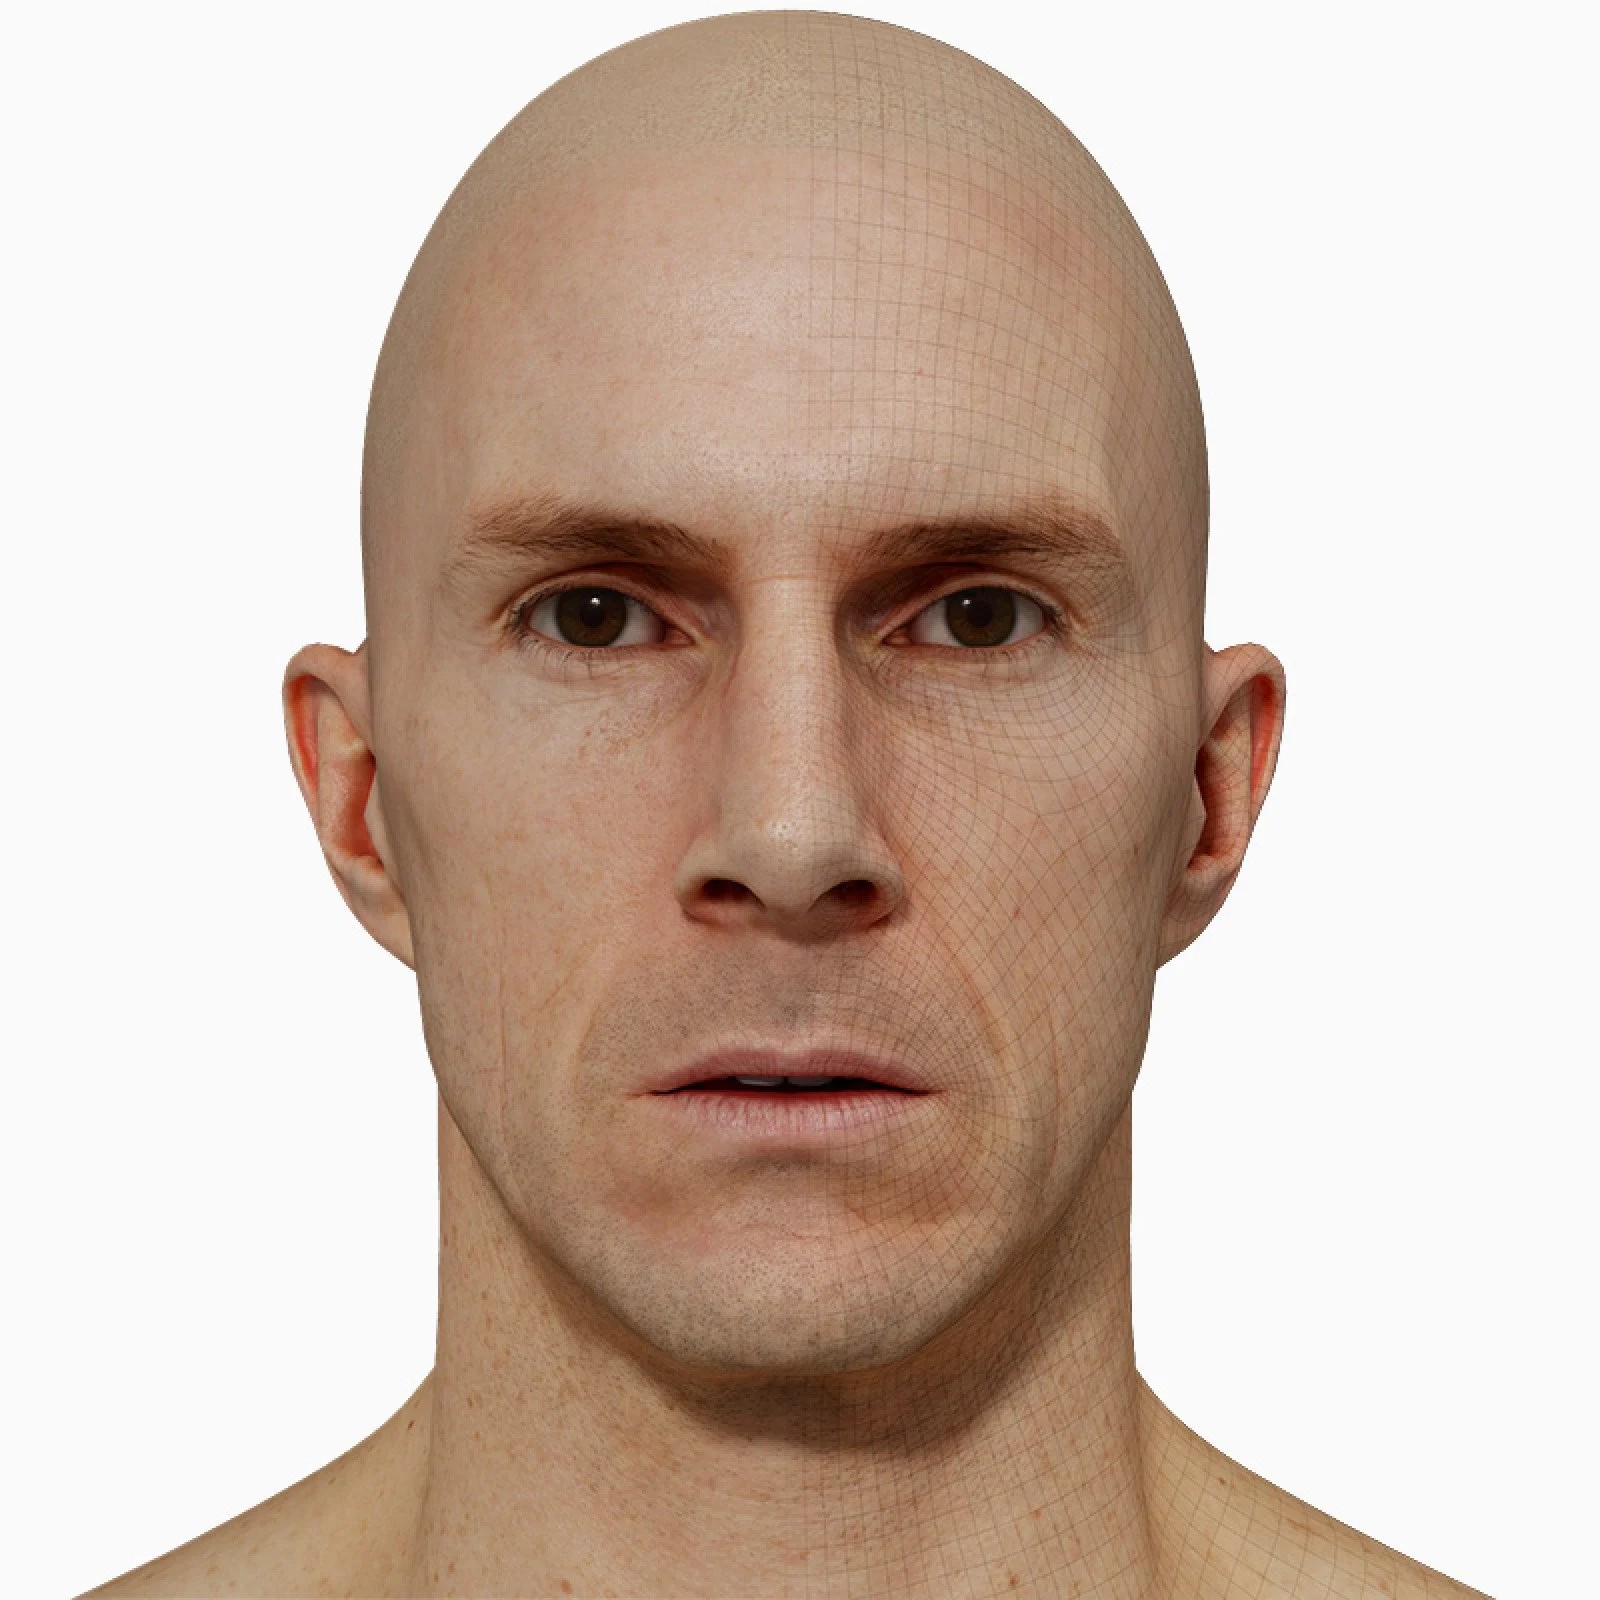
One notable achievement during this phase was the ability to record a video of our own faces and seamlessly apply it to the Human character. This remarkable technique, known as facial motion capture, not only ensured authenticity but also added a layer of realism that enhanced the character's presence in the cinematic. Moreover, we rigorously tested the character's compatibility with motion capture data, ensuring a seamless transition into the next stage of production.
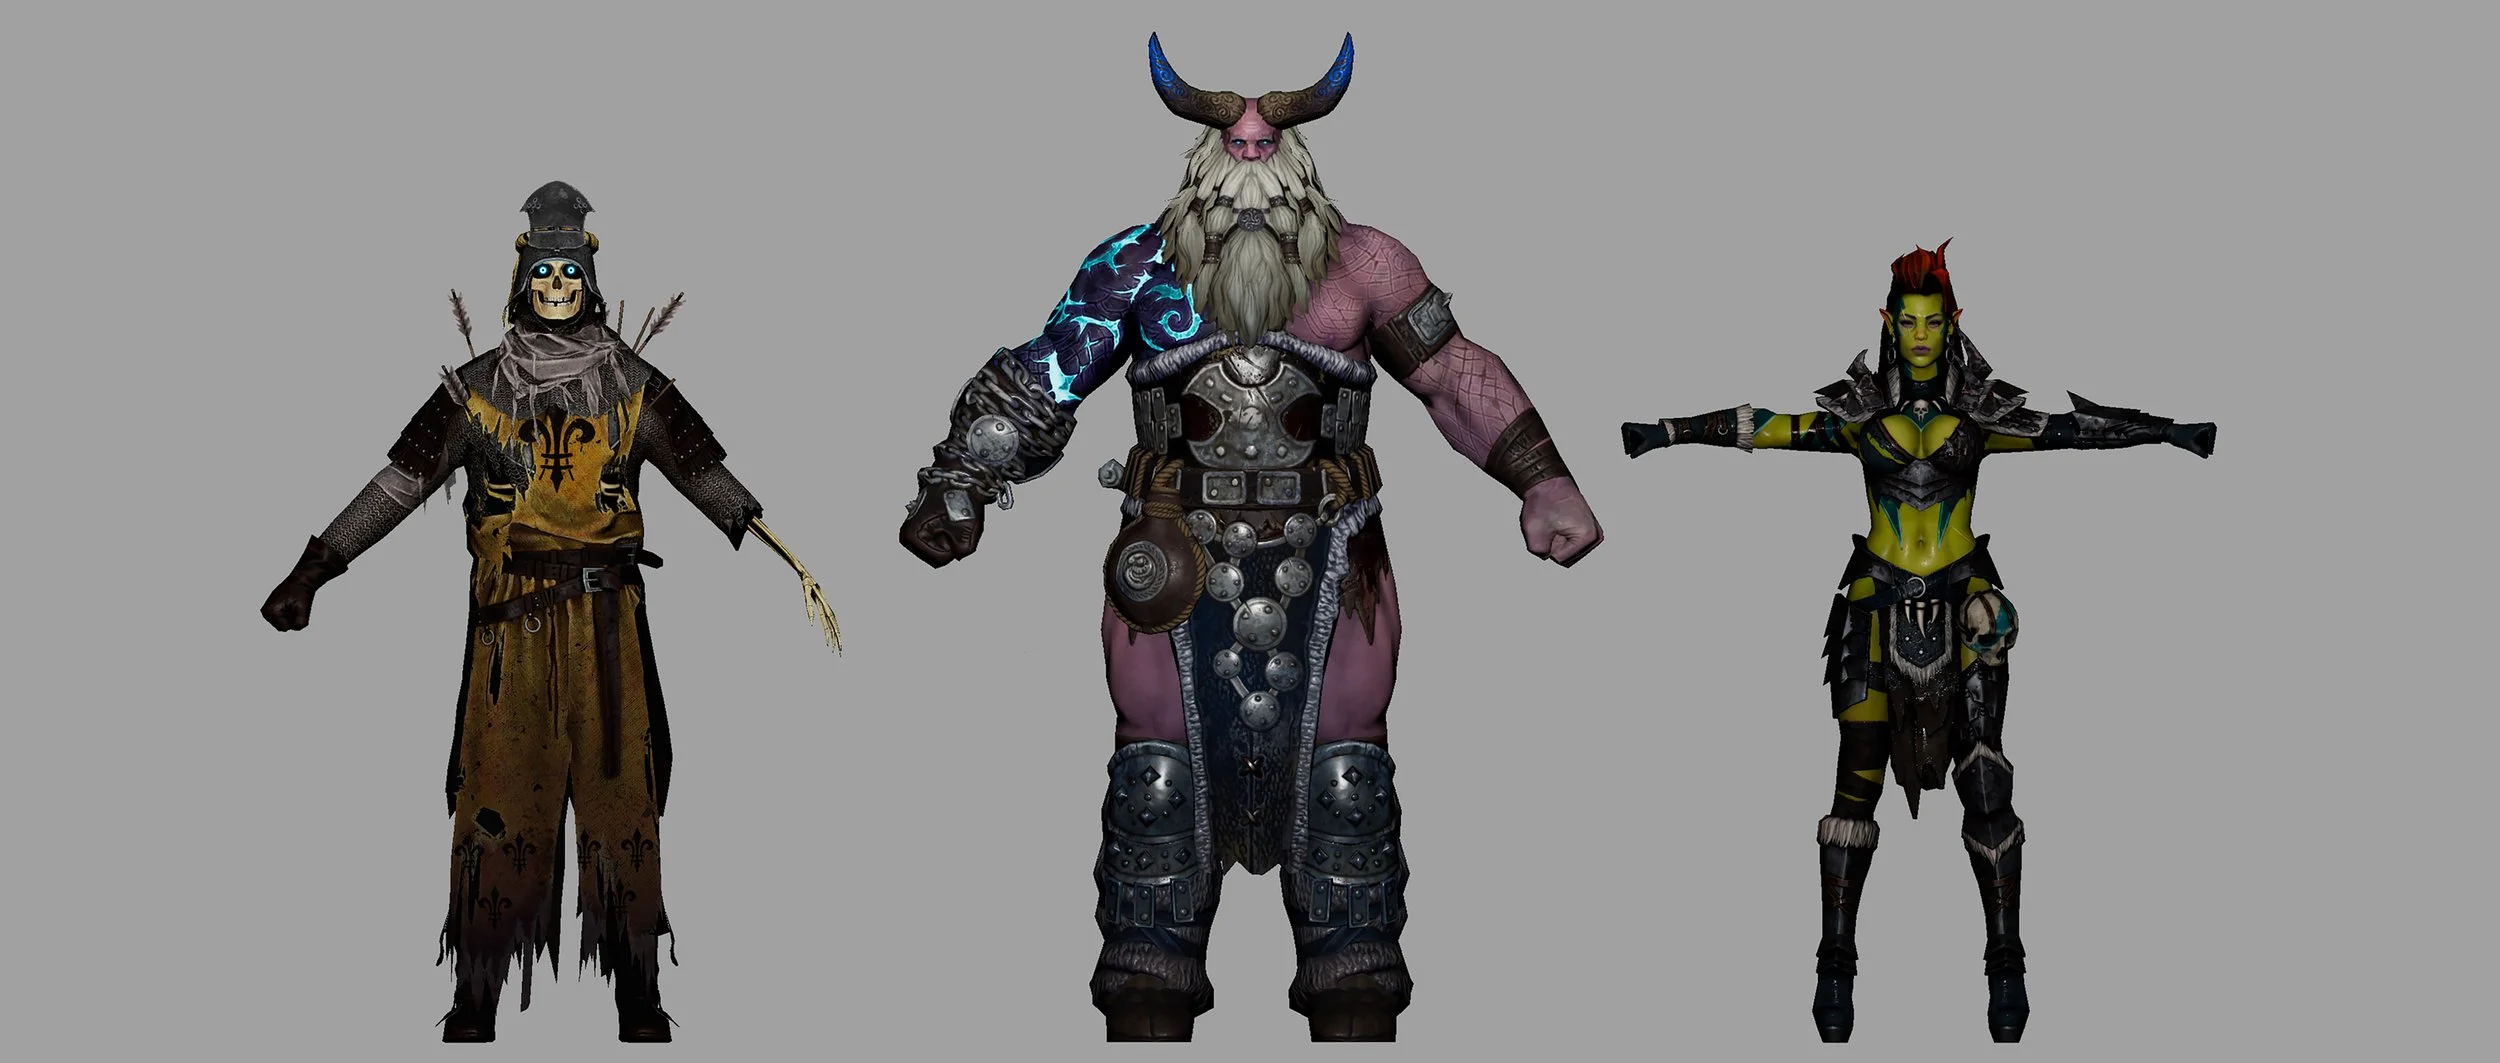
Preparing our characters for animation and integrating them into Unreal Engine was a crucial step in our project. We were fortunate to receive character assets from both Plarium and Capcom.
We meticulously configured each character's presence within the digital realm of Unreal Engine, leveraging our expertise to ensure a seamless integration of the provided assets. This involved setting up their fur, hair, clothing, and character-specific visual effects, working diligently to create a bridge between concept and 3D reality. Our team refined shading and textures to an impressive level of detail, breathing life into these iconic characters within the Unreal Engine environment.
Our commitment to maintaining a consistent level of quality across the board led us to make some enhancements. Particularly, we focused on elevating the Rathalos character to match the high fidelity we had with the Raid characters.
RATHALOS
These turnarounds provide a glimpse into the impressive level of detail. However, it's important to note that our primary focus was on configuring and optimizing these assets, ensuring a robust pipeline for the project's advancement.
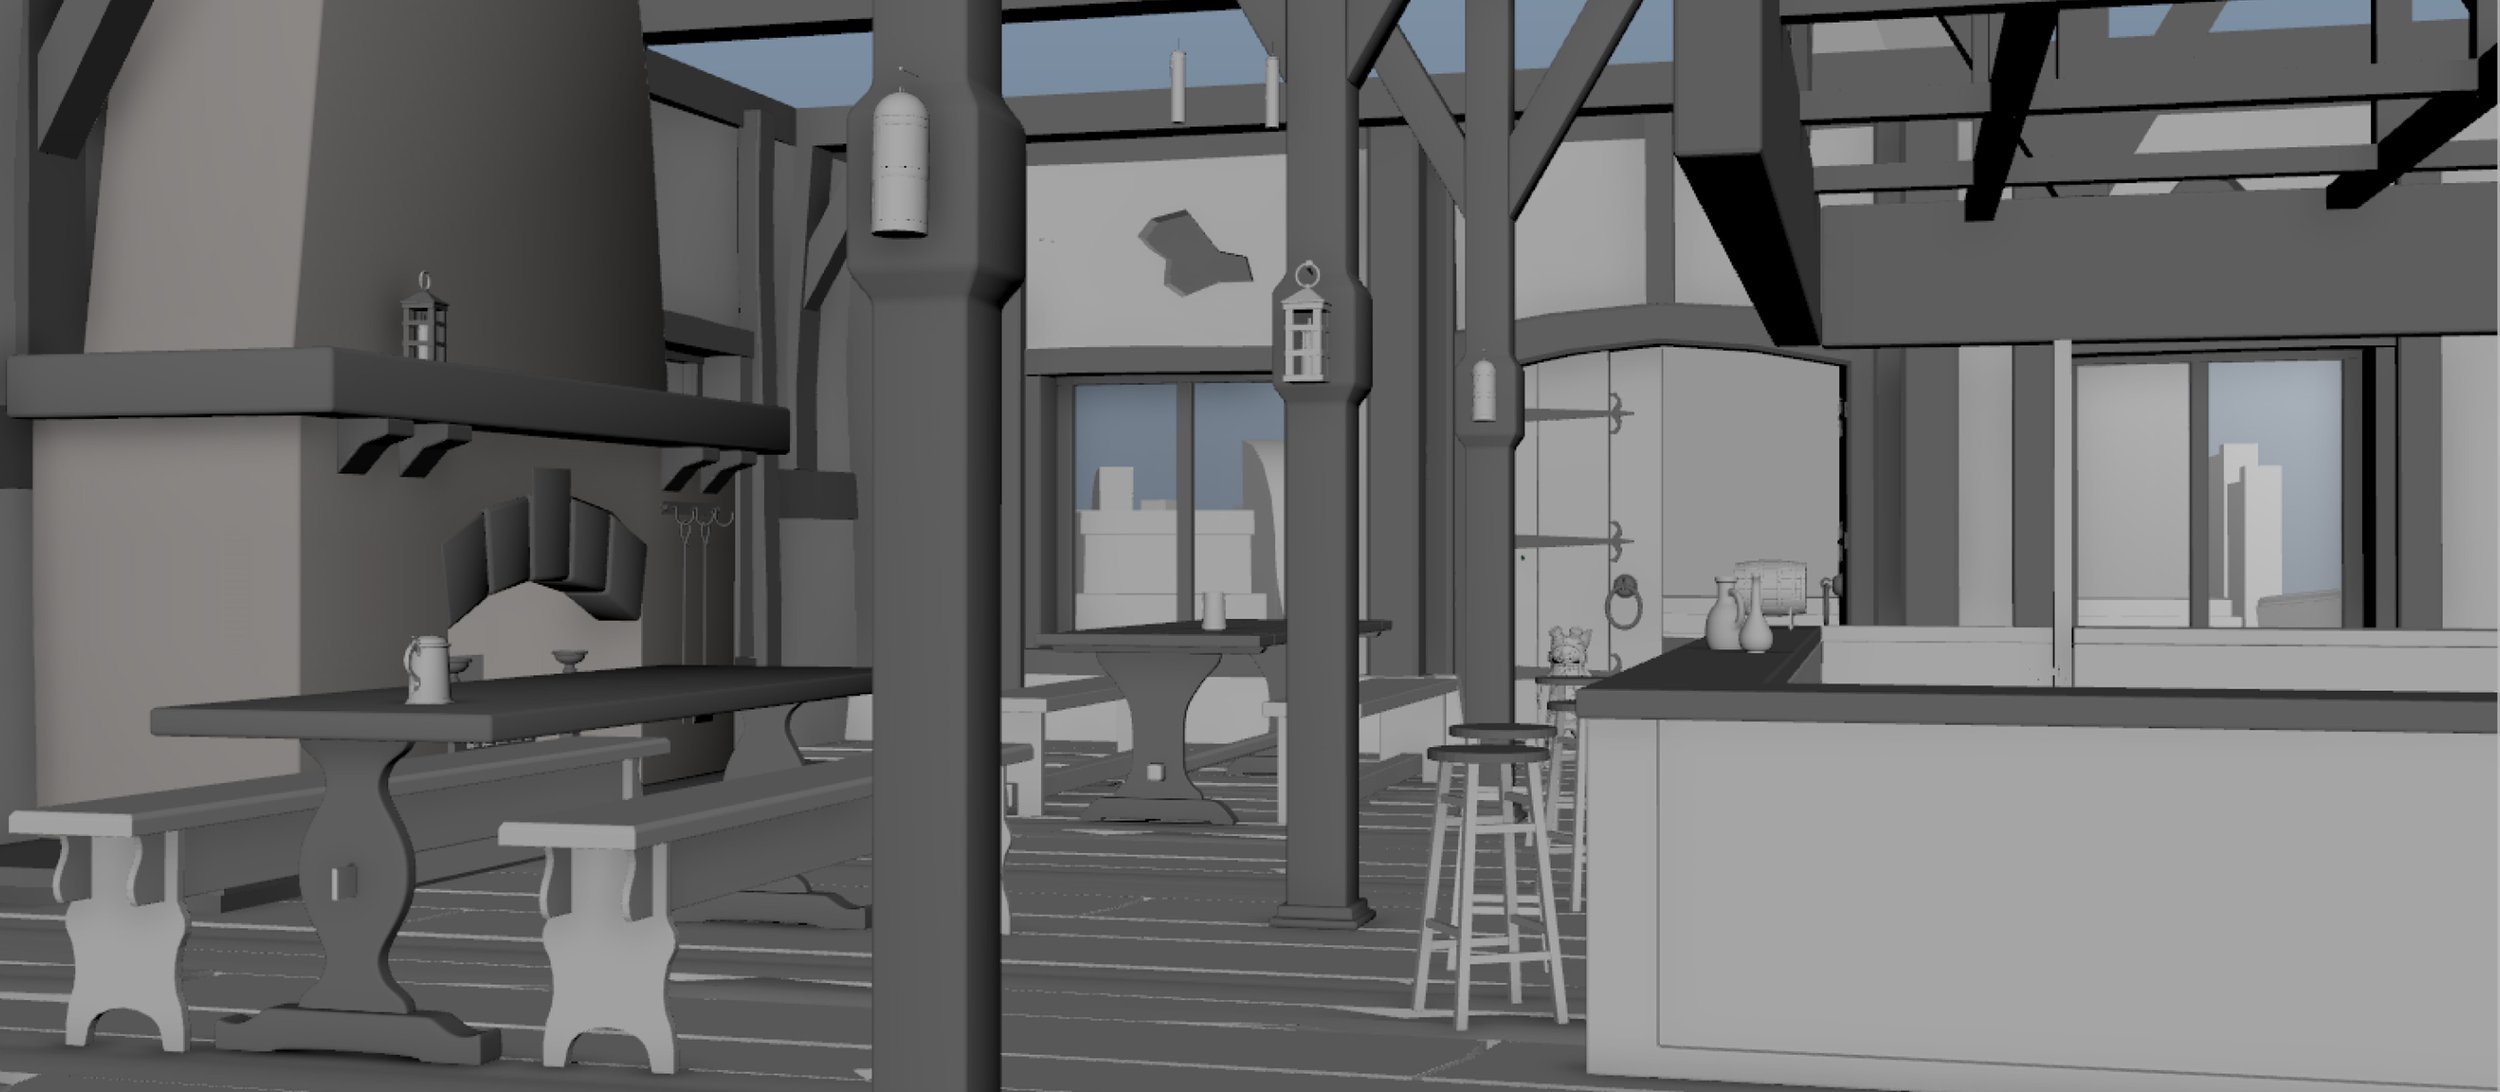
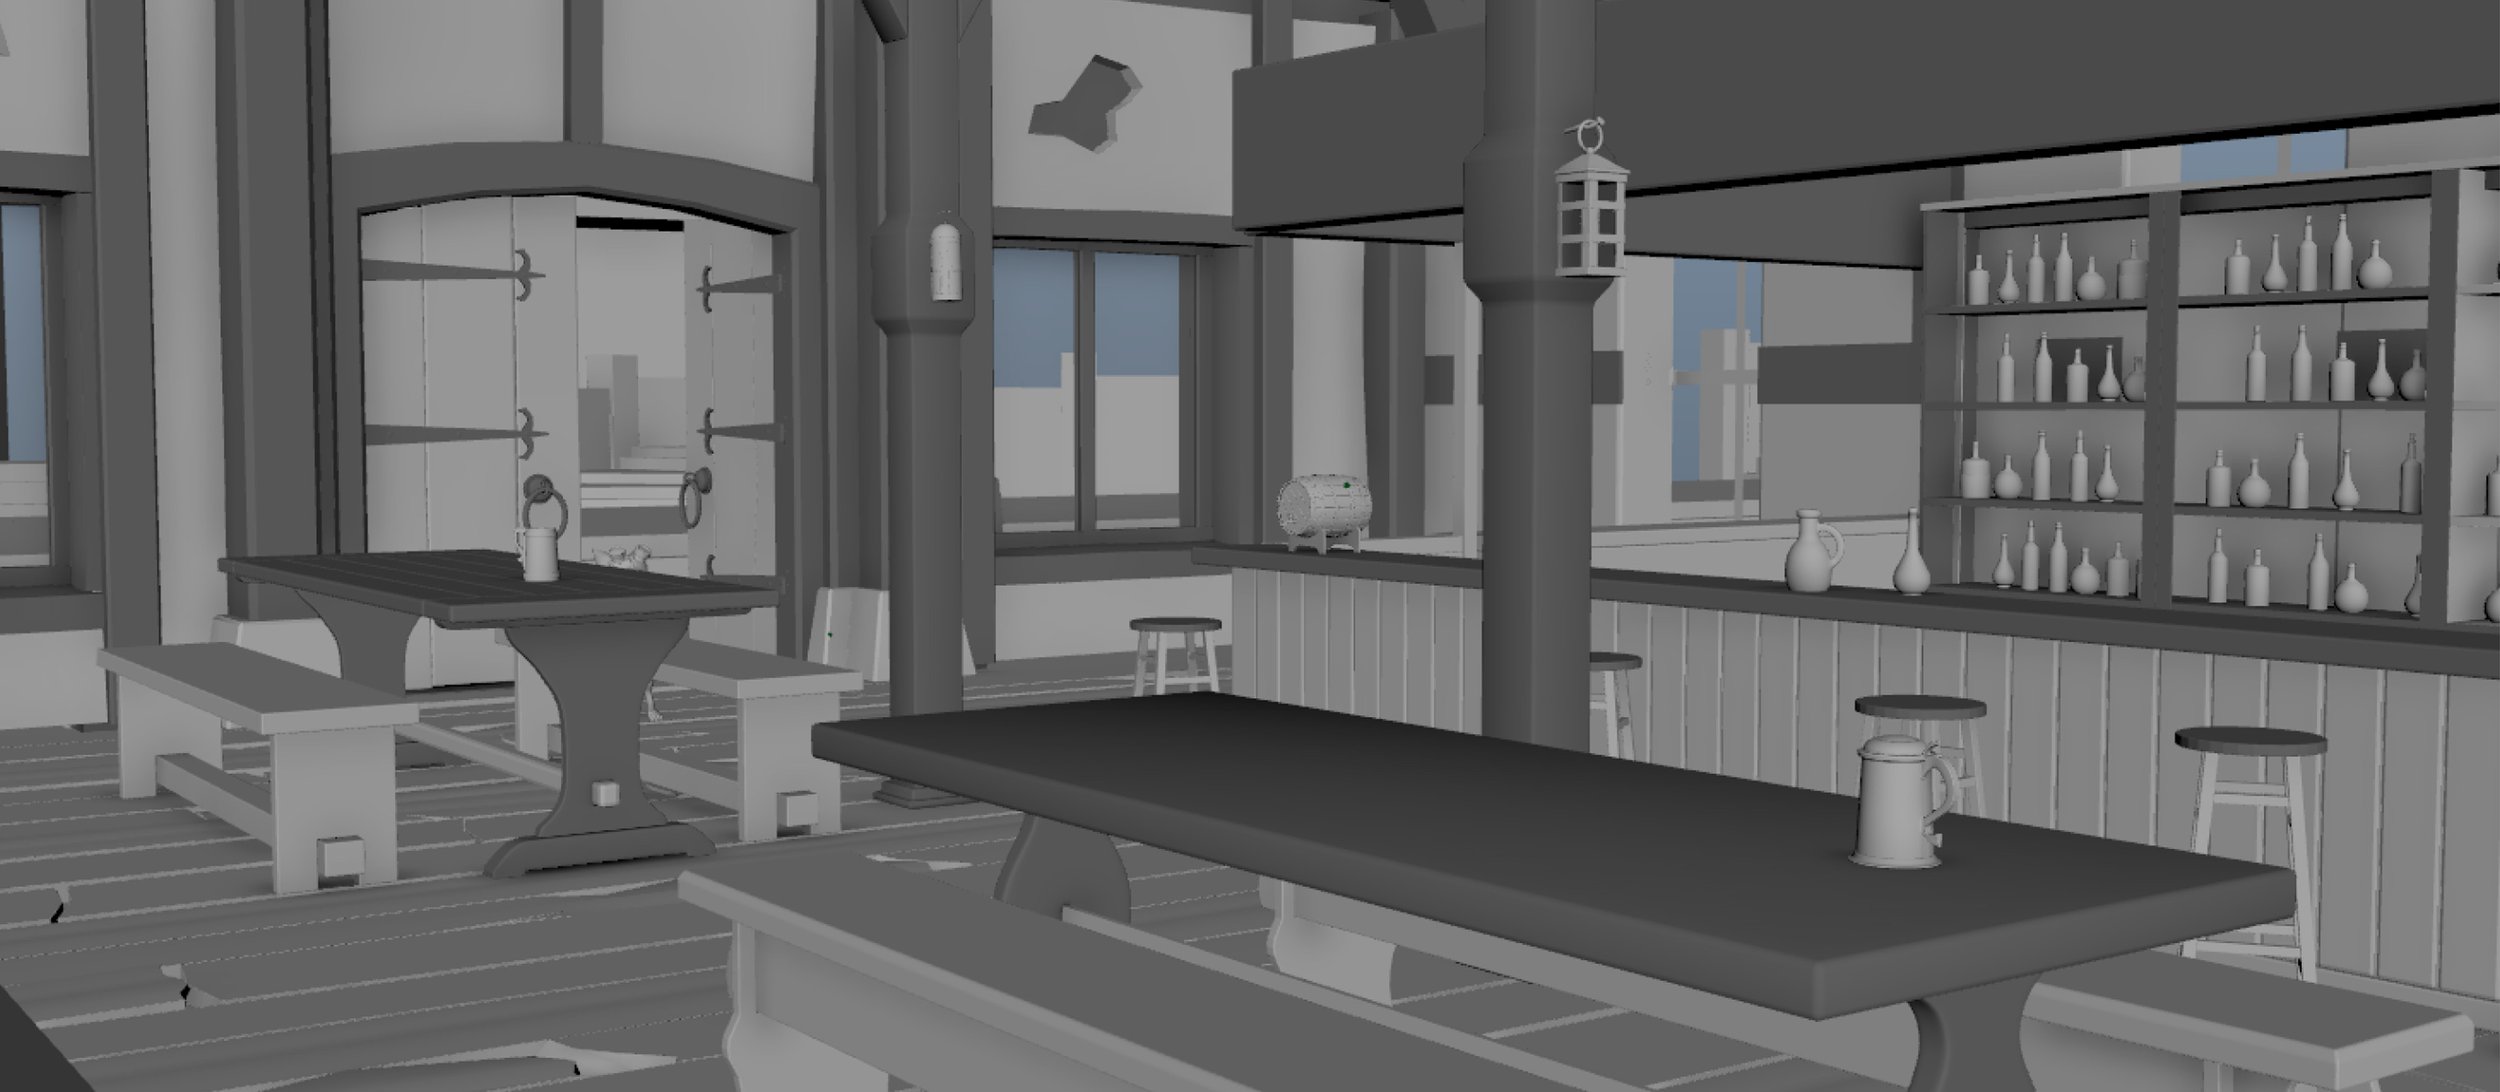
In the next crucial stage of our project, we focused on enriching our sets with high-resolution assets. Precise composition was key, aligning these assets with our previsualised camera angles, which were already 95% locked in a particular direction. Leveraging Unreal Engine, we seamlessly integrated photorealistic assets and experienced the incredible advantage of real-time visualisation. As demonstrated in the video, we effortlessly manipulated and positioned trees, receiving instant feedback and visualising how the environment would appear within each shot. The end result was an environment perfectly tailored to all our cinematic needs, providing flexibility as we navigated through the set. Explore the video below to see the full cave exterior environment with daytime lighting.
Crafting Character Performances
In the animation stage, we brought our characters to life throughout the trailer, including the formidable Monster. Our approach involved meticulous planning and a combination of hand-keyed animation and motion capture, each serving a unique purpose.
For sequences demanding precise control and artistic finesse, we turned to hand-keyed animation. This method allowed us to carefully choreograph the action, particularly during intense combat scenes and the Monster's menacing presence. Our animation process consisted of two primary stages: the blocking stage and the spline/polish stage. During the blocking stage, we created key poses that outlined the character's actions, avoiding excessive detail. Once approved by our clients, we transitioned to the spline/polish stage. Here, we added intricate in-between keyframes, refining facial animation, and meticulously adjusted character details that were not simulated, such as larger items of clothing.
As an example, consider the Rathalos character's cinematic reveal. During the transition from blocking to spline/polish stages, we refined shoulder movements and introduced pronounced head shakes, showcasing how our animations evolve and gain depth throughout the process.
In contrast, motion capture played a pivotal role in capturing a realistic, game-like essence for various performances. Once we had multiple takes of the performance, we utilized previews of the data represented by a green man and seamlessly integrated them into the existing previs. This approach allowed us to efficiently make performance selections and apply the raw data to the characters, preparing them for the subsequent cleanup process. During cleanup, we meticulously fine-tuned the positions of hands, mouths, and other character elements, addressing any issues or discrepancies present in the raw data. The result was a meticulously crafted, smooth, and convincing piece of animation that brought the characters to life with authenticity and precision.
Below is the approved final character animation pass, This encapsulates the culmination of character performances and a crucial camera adjustment pass. The camera adjustments are meticulously crafted to harmonise with the final character performances, ensuring the characters remain expertly framed throughout. These adjustments guide the audience's eye to focus on key elements, creating a seamless flow between shots that enhances the overall cinematic experience.
After the animation stage received approval from the game studios, we reached a crucial milestone, allowing us to lock it down and proceed with the process of effects and simulation. This began with the meticulous handling of cloth and hair simulations for all characters. Here you can see a test piece of motion capture data, seamlessly integrated with our cloth simulation setup. This intricate process was repeated for each character in every shot, requiring careful adjustments to avoid intersections with other body parts and to maintain the desired level of realism, eliminating any overly bouncy or unrealistic results. This phase prepared the characters ready for the lighting stage.
In our pursuit of cinematic realism, we meticulously crafted multiple passes for each shot to elevate the level of detail. An illustrative example can be found in a particular shot where Deathknight lands on the ground and slides briefly. To enhance the authenticity of this moment, we applied various passes, including a bark pass, mud pass, dust pass to simulate the drag on the ground, and even subtle smoke emanating from the arrows on his back. These additional FX passes were meticulously applied to every shot, playing a crucial role in enhancing overall believability and elevating the cinematic quality of the trailer.
In specific instances, such as the pivotal logo reveal within the fiery ambiance of the cave, we employed a proactive approach. Multiple simulation options were meticulously crafted, offering our client the opportunity to select the direction that best aligned with their vision. This collaborative process ensured that every detail, even down to the logo reveal, met the client's preferences and elevated the overall impact of the trailer.
The Power of Lighting with Unreal Engine
With the meticulously crafted 3D environments in place, the next critical step was to breathe life into them through the art of lighting. Our team meticulously implemented lighting schemes, all while adhering to the initial concept art established at the project's inception. Powered by Unreal Engine, the video below showcases the raw, unadulterated rendering directly from Unreal, devoid of any color adjustments or compositing. This unfiltered look into the lighting process provides a glimpse into the mastery behind crafting the immersive visuals that enhance the cinematic experience.
In conclusion, our journey through the creation of this high-end cinematic trailer has showcased the immense creative potential of Unreal Engine. From conceptualization and storyboarding to character animation, simulation, and lighting, Unreal has proven to be an invaluable tool for bringing our cinematic visions to life. As we continue to push the boundaries of what's possible in this dynamic medium, we invite talented individuals to join us on this exciting adventure. If you're an artist, animator, or creator looking to be part of groundbreaking projects like this, we'd love to hear from you.
We also extend our heartfelt gratitude to our clients, Unobtainium, Plarium, and Capcom, for entrusting us with their valuable intellectual properties.