It’s been just over a year since we published our blog post about receiving Apple's new Mac Pro and using it while working on Jumanji:The Next Level. What a year it’s been! Shortly after we posted the article, the rest of 2020 quickly became a very strange year. Like everyone else, we endured moving our entire team over to remote working and the challenges that brings from artistic to technical hurdles. Fortunately even though the whole world came to a crashing halt, we continued to produce animation. But more importantly, software development for the Mac continued and we’re now entering a very exciting time with more support than ever for professional tools designed for the Mac Pro which really begin to take advantage of its power.
Today we’re going to give a 12 month 3D computer animation perspective on the Mac Pro and Pro Display XDR. We really push our computers hard on a daily basis and benchmarks don’t always reflect real world use on a project. So in this post we will focus on how the Mac Pro has affected our current workflows and how it’s opening up new and exciting workflows for the future.
FUTURE WORKFLOWS
We’ll then take a look at some of the new workflows that take advantage of the Mac Pro hardware and the Pro Display XDR to allow us to do things which we couldn’t do before.
EXISTING WORKFLOWS
The first part of this post we’re going to look at some of the things we noticed as we simply dropped the Mac Pro into our current workflows replacing existing iMac Pros and the kind of things a Pro user can expect.
THE MAC PROs WE’VE BEEN USING
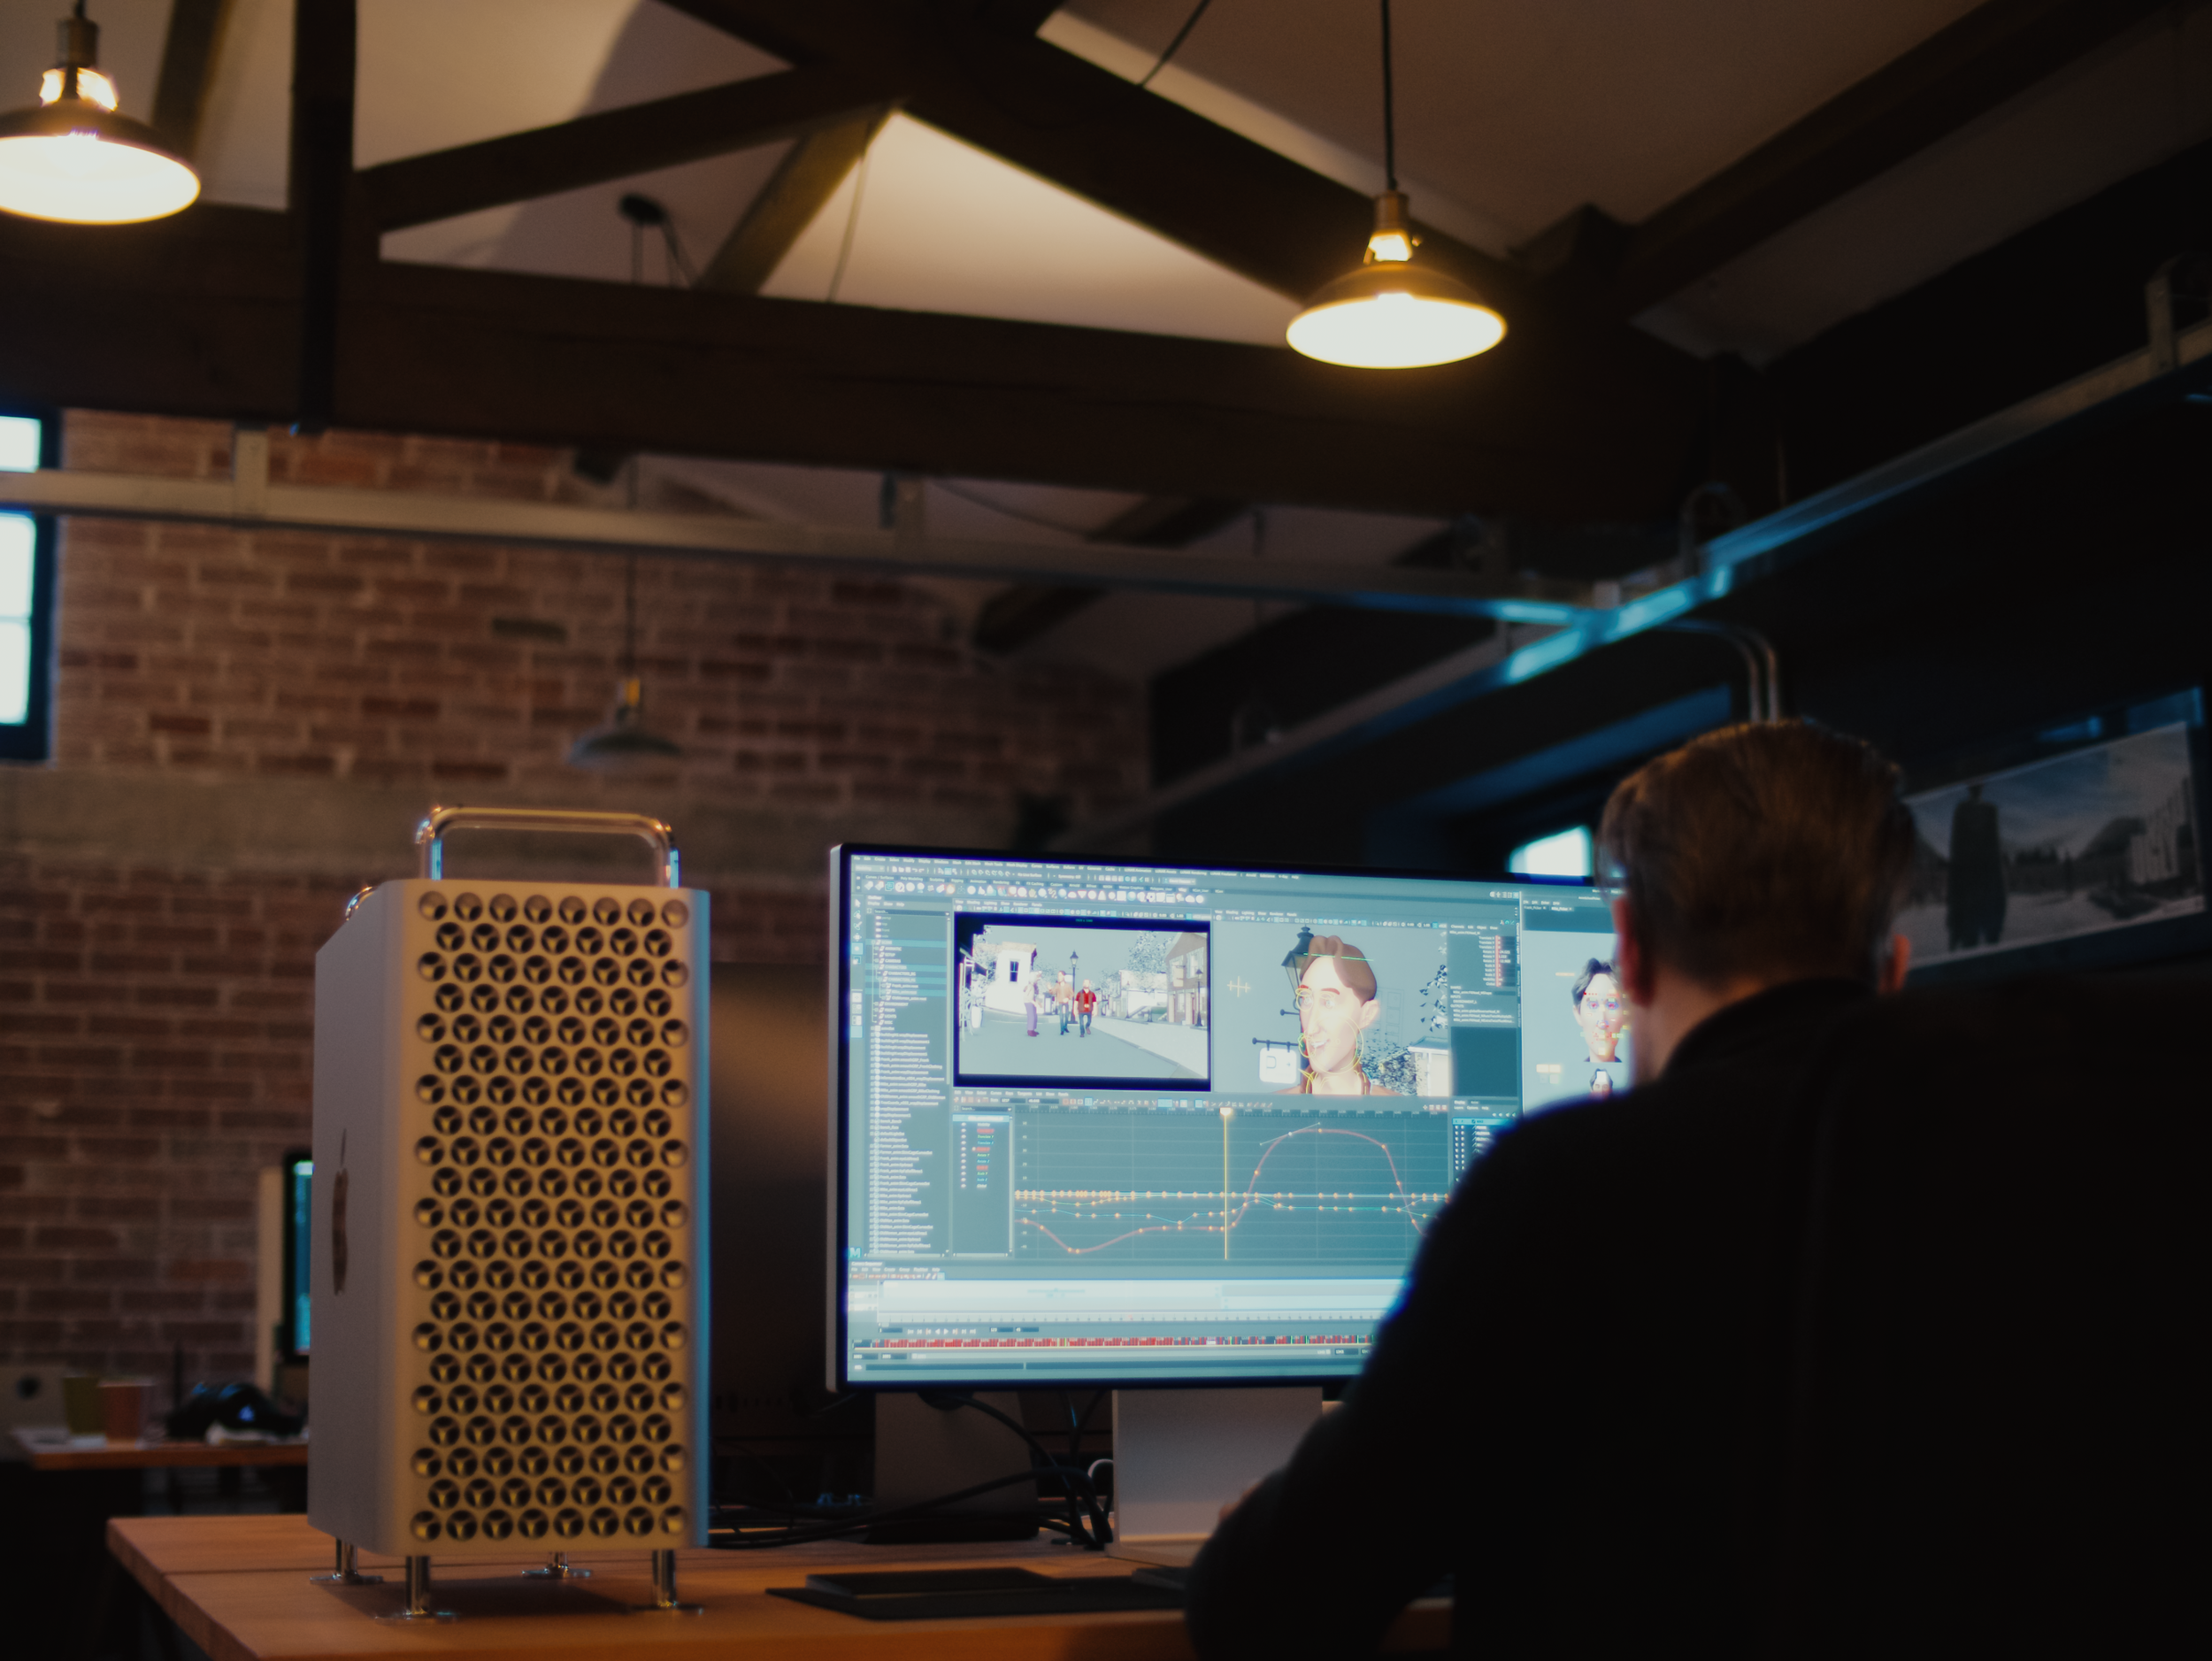
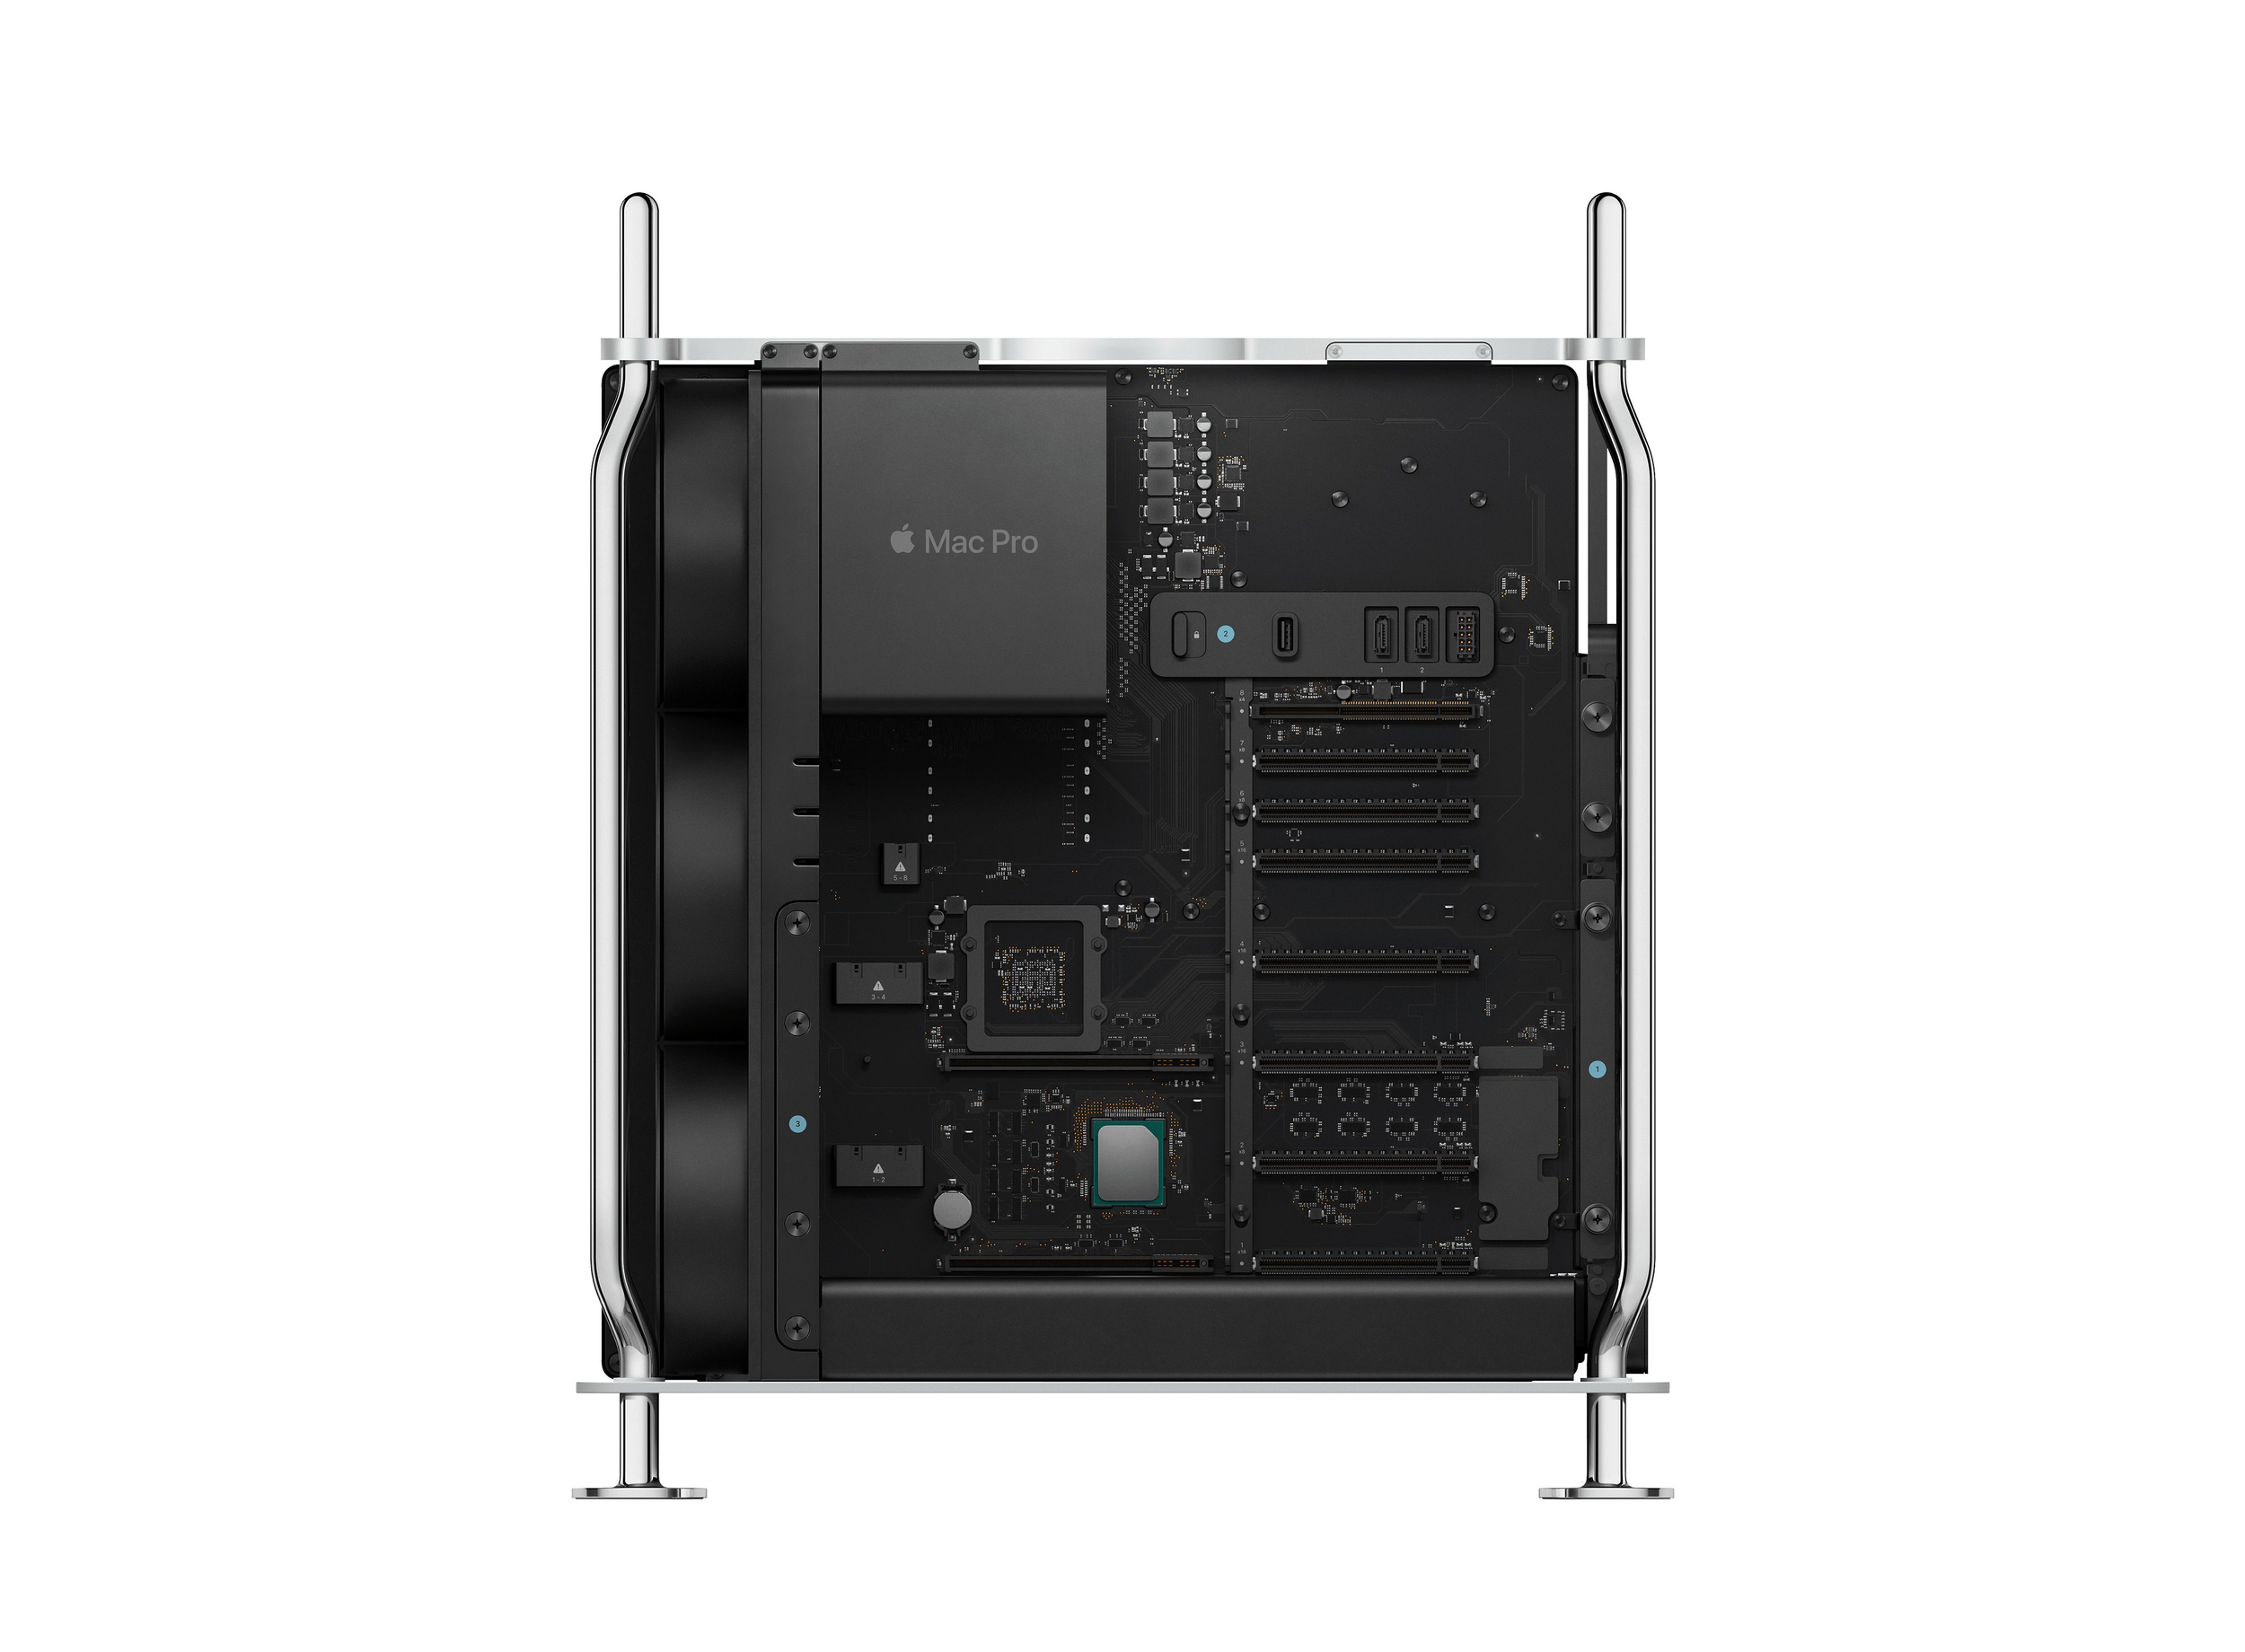
We currently have two Mac Pros in the studio, we have a mid-tier model which has the 16-core CPU and dual graphics cards and then a higher tier 28 core model, which has four graphics cards. Now I know what you’re thinking, why on earth would you want four graphics cards? Well we’ll get to that later in the post. We’ve listed the specs below of both units for context.
A Mid-Tier Mac Pro, which is the same model we used in our last post:
3.2GHz 16‑core Intel Xeon W processor, Turbo Boost up to 4.4GHz
Two Radeon Pro Vega II with 32GB of HBM2 memory each (2 GPU’s)
We also have a pretty much fully spec’d out model, but without the 1TB of RAM:
2.5GHz 28‑core Intel Xeon W processor, Turbo Boost up to 4.4GHz
Two Radeon Pro Vega II Duo with 2 x 32GB of HBM2 memory each (4 GPU’s)
Both machines are connected to a PRO DISPLAY XDR with the Pro Stand.
THE EXISTING SOFTWARE WE USE
As we specialise in 3D computer animation, the software we use isn’t always obvious and there are a few different options out there. So we thought we would list out what we currently use at the studio for production and it will give context to aspects of the piece when referring to software support and new software options we’ve been testing. These are all industry standard pieces of software used to create most TV and feature films.
MAYA - 3D MODELLING AND ANIMATION
V-RAY - RENDERING ENGINE FOR MAYA
HOUDINI - SIMULATION AND EFFECTS
NUKE - COMPOSITING
DAVINCI RESOLVE - EDITING
SUBSTANCE PAINTER - SHADING AND TEXTURING
ZBRUSH - 3D SCULPTING
ADOBE PHOTOSHOP - IMAGE EDITING
DEADLINE - RENDER MANAGEMENT SOFTWARE


EXISTING WORKFLOWS
So you get your new Mac Pro, unbox it and plug it in. You install all the software you were using on your previous machine. At first in many ways it feels familiar, you’re staring at the same macOS, but then you realise you’ve got deadlines to meet and need to get working on your CGI shots, whether that’s character animation, simulation, lighting and rendering. Suddenly the only thing that matters is the content you’re making and that’s what we’re going to look at – the noticeable things that this machine really helps with once you start working as an artist.
MULTI-TASKING AND STABILITY
OK, we all know the machine is fast and it should be, I mean the spec says it is. However when you’re working on a 3D animation project, you’re dealing with really heavy 3D scenes, that are carrying millions of polygons of geometry, characters, lights. A great example of a project like this is a commercial we made at the end of 2020, with our partners over at Roger in LA for the Disney Bundle. It was a challenging project that involved shots which had an entire city with people and cars, along with elements of pretty much every major IP you can think of. You can watch the commercial below to give you context:
On an iMac Pro workstation you might struggle to open a scene like this, but on the Mac Pro we’re able to actively work on the scene with multiple applications open at the same time.
What this means is that rather than having to close the heavy scene, load up the 3D model we want to adjust and then close that and reopen the original scene to continue working, we are able to simply switch spaces in macOS, add a light to a 3D model and quickly switch back and check the update with the interactive IPR renderer.
Then while we’re waiting for that to create a preview render, we can switch over to another screen and adjust another model.
What we’re seeing here is the fluidity of the artist working and not having to be ground to a halt because the computer is having to think. It feels like having multiple computers at your fingertips. All without constant crashing, which means we avoid losing work and more importantly save artists’ time.
Above you can see a video we have recorded to try and showcase what this is like when working on something like this. Anybody that works professionally in this field will appreciate that being able to continuously work without getting bogged down is incredibly exciting.
SIMULATIONS AND EFFECTS
If you’re a technical effects artist then you’ll be used to working in a piece of software like Houdini and spending your time constantly setting off simulations, whether that’s liquid or smoke simulations and these are all widely known to be very slow to create. On a daily basis you might be submitting those to a render farm in the studio for other computers to evaluate while you continue working on something else.
However we’ve noticed while working on the Mac Pro, you can easily simulate in the background while continuing to work, all without seeing any major performance hits. The video below demonstrates adjusting a simulation and setting another one off while continuing to work on another scene.
Depending on the type of simulation you’re doing you can run more than one, based on whether the simulation is using the CPU or GPU to do the calculation. For example cloth and grain is typically calculated using the GPU, and if you have four GPUs in your Mac Pro then you can utilise all of them working away in the background.
This kind of workflow is something that has become evidently more important in the last 12 months since our artists have been working remotely away from the studio. One of the challenges with effects and simulations is the amount of data that is created in a simulation cache. It’s easy to create frames that are a gigabyte each and suddenly you need to be able to upload terabytes of data back to the studio to render. The ability to work on a Mac Pro and feel like you have a little renderfarm inside is extremely powerful.
CHARACTER ANIMATION
If you’re a character animator, performance is always very important, because every time you want to see your characters move you don’t want to have to play-blast it, which essentially means rendering the animation out to a video file to be able to preview.
As you can imagine this slows the animator down and play-blasting is often common practice if you have multiple characters in a 3D scene. So we wanted to take a look at what animation performance improvements we get out of the door when working with characters on a Mac Pro. The video to the right is the cinematic for Gods of Olympus. We’ll be looking at one of the shots from the cinematic with nine characters and how it performs with playback.
So all nine characters playback at real time 24 frames per second (The frame number fluctuates but this is common when hitting the play button it can take a while to settle down). Which is very impressive for so many characters in a Maya scene. In the video you will also see that if we turn on cached playback which essentially saves the characters movement in the 3D scene and is intelligent so it will only need to re-cache the changes that are made as you animate. With this turned on and along with ‘Play Every Frame, Free’ which uncaps the speed of playback we now see up to 50 frames per second.
THE 32” PRO DISPLAY XDR IS MASSIVE
One of the really nice things about the Pro Display XDR is the size and resolution. Typically with 3D animation software, they always seem to have multiple windows, graphs, node editors and viewports, due to their complexity and managing all of these windows can be tricky. It’s relatively common for animators to use a second display when working. However at our studio most of our artists use a single 27inch 5K iMac Pros. The reality when using larger displays from a 27” and upwards is that you really have to turn your head to look from one monitor to the other while working and with the ability in macOS to easily switch between screens (or another space), that need for a second display starts to disappear. The only challenge if working on a single screen is being able to fit all of the animation controls into that single display comfortably. Now with a 6K 32” display we might have the perfect balance.
So we have laid out the typical character animation setup in Maya on both a 27” 5K iMac Pro and 32inch Pro Display XDR and how this looks from an operational point of view. The additional screen real estate is immediately giving the animator an entire character picker without losing any or the perspective or camera views in the scene. You can click each image to see it in its full resolution. Being able to fit all of this on a single display is amazing for animating with and this kind of benefit is the same with other workflows like effects and simulation, lighting and rendering.
5K - IMAC PRO
6K - PRO DISPLAY XDR
P3-DCI
We wanted to elaborate on the P3-DCI support with the Pro Display XDR, I know in our last blog post we described the new monitor as a game changer when we were working on the Jumanji:The Next Level end titles at the time of receiving the new Mac Pro and Pro Display XDR.
P3-DCI is not a format that is going to be used by most creatives out there, you need to be working on feature film content designed for the American film industry, but for a studio like ourselves, now having three of the displays within the studio gives us the ability to do something we simply couldn’t before.


Having a display with P3-DCI allowed us to work on the film in the correct colour space so we knew exactly what our end product looked like, we knew exactly what our final deliverables looked like and without this we would have needed to rent a very expensive alternative. So the value in having access to this feature was amazing.
When using macOS connected to a Pro Display XDR it’s as easy as selecting the option from the ‘Display Preferences’ as seen on the left to switch your Pro Display XDR into P3-DCI mode.
We can now comfortably provide a service for our clients and they know we permanently have the ability to create our content in P3-DCI.
You can read more about P3-DCI here.
FUTURE WORKFLOWS
So far we’ve touched on a few of the really impressive things that we immediately benefitted from when swapping our iMac Pros out to a Mac Pro, but over the past year we’ve seen new software technologies that provide support for doing more using the Mac Pro’s GPU and this can provide incredible gains for animation production. We’ve started to look at how we can take advantage of these new technologies, as we look to adopt these into our workflows and pipeline.
GPU RENDERING ON THE Mac Pro
For as long as computer animation has existed, when we render a frame of animation, it’s primarily been the CPU that has done most of the calculation. This has meant the more CPU cores, the faster it will render. However over the last few years with the advancements in GPUs, software developers have started creating software to allow rendering engines to utilise a computers powerful graphics cards when rendering instead. The results are astounding and since the release of the Mac Pro in late 2019, this software is finally now available on macOS and we’re going to showcase some of it running on the Mac Pro. For our demos we’re going to look at two leading GPU rendering engines, Octane and Redshift. Both the examples will be focused around rendering simulated effects like smoke and fire as these are typically very slow pain points in our production that normally take a long time to render and are usually done as separate passes and composited to a background render for a final image.


OctaneRender® is the world’s first and fastest unbiased, spectrally correct GPU render engine, delivering quality and speed unrivaled by any production renderer on the market.
Redshift is a powerful GPU-accelerated renderer, built to meet the specific demands of contemporary high-end production rendering.
TESTING OCTANE IN HOUDINI
While testing Octane we created a stress test in Houdini. We wanted to see what octane could handle, so we enabled all of the features that are typically too slow to render on the CPU. Detailed smoke simulations, depth of field, motion blur, environment fog and multi bounce global illumination.
This initial example was rendered completely on the Mac Pros GPUs (Two Radeon Pro Vega II Duo). A typical frame took approximately three minutes to render a noise free image at HD 1080P.
The same frame on the CPU took over 22 minutes per frame, that’s a 10X saving on the amount of time it takes to render.
If you’re an artist working on something like this being able to render out a frame that quickly is incredible. Fast feedback allows an artist to iterate quickly, and ultimately get a better result in less time.
Below we’ve made a video showing the difference between rendering a frame using the GPU and CPU so you can see the difference.

OCTANE VS CPU
In our test above we start the clock on the first In our test above we start the clock on the first pixel as both take a minute to think about what they’re doing. But as you can see from the test Octane on the Mac, it is lightning fast, rendering the smoke simulation in two minutes and 36 seconds, compared to the CPU render which took 22 minutes and 21 seconds.
Not only is Octane ten times faster when rendering on the GPU, it’s also a much clearer render with a lot less visible noise.
If you’re wondering why they look a little different, it’s simply because different renders evaluate the smoke volume slightly differently and have different shaders to display the volume.
We’re looking forward to the support for motion blur on deforming objects like characters, so we can test using it on a production.
TESTING REDSHIFT IN HOUDINI
For the second GPU test we turned to look at Redshift, again set up in Houdini. At the time we were working on a very effects heavy game cinematic for the game Mythic Legends, an action-packed strategy mobile game by Outfit7. For context you can watch the cinematic trailer below:

In the cinematic there is a Demon Knight who has a sword that ignites and bursts into flames, smoke pouring from it while he swings the sword around. So we thought this would be the perfect shot form a technically complex scene and see how much faster it is to render an effect like this using Redshift over rendering the effects traditionally using the CPU. We’ve created a video to show the difference when rendering the fire sword effect on the GPU compared to the CPU. As mentioned previously this is the kind of render that would normally take a very long time and is a pain point in our production.
Again we’re seeing the same crazy results we had when working with Octane. A typical frame of the fire on the sword that takes 26 minutes to render is now rendering in 58 seconds.
This is a serious improvement and again the final image is represented slightly differently due to the way that Redshift interprets a volume and how it shades it, but this wouldn’t be an issue and we can control the final look when the effect is composited in nuke with the background plate.
We didn’t want to simply throw Redshift immediately into that production when testing, but we plan to use this on the next project, now we have a workflow and pipeline to take advantage of these performance improvements.
RED SHIFT VS CPU
GAME ENGINE PIPELINES

Another area of extreme interest to us has been film production using game engines. As game engines have increased in visual fidelity in recent years the idea of using one to create animation has become a very interesting concept and now we have the Mac Pro and support for Unreal Engine using Metal. We thought we’d give it a go.
To make sure we gave this the best possible evaluation David our Lead Technical Director at the studio enrolled in the Unreal Fellowship program. This is five weeks intensive course where you learn how to move your studio pipeline over to unreal and in the process you create an animated short based around a theme. The theme in this case was ‘Exploration’. It was important to us that it utilised similar assets to what we would normally create for a high end production, so David used models we had previously created for ‘Delta Zero’ our VR experience. Below you can watch his piece, made entirely by him in a five week period.
As you can probably appreciate the end result is amazing for one artist to create on their own in such a short period and having never used the Unreal Engine before.
The other important thing to remember is that it was also made on the Mac Pro, utilising the Radeon Pro Vega II GPUs. It took around 30 minutes to render out the entire project at the end. Creating something like this using our traditional pipeline would have taken a week to render using our studio’s render farm.
So it’s great to see the support for Unreal on the Mac, the only thing that wasn’t supported, which we’re looking forward to arriving in the future is discrete ray tracing on the graphics cards once newer GPUs are supported on the Mac Pro with that hardware feature.
We’ve also made a short video showing unreal running on the Mac Pro, adjusting and changing aspects of the opening shot and you can see how fast the performance is and how quickly it can render out an entire scene.
UNIVERSAL SCENE DESCRIPTION
Universal scene description or USD is a format for storing 3D data and how it is arranged in a scene. It was developed by Pixar and was made open source. It’s seeing wide industry adoption and it’s fast and ultra light weight compared with legacy formats. USD also allows for multiple artists to collaborate on the same scene more effectively.
Apple has already integrated it into macOS, so you can simply hit the spacebar to preview a USD 3D model right from Finder. It even supports reading USD files that reference other USD files, and supports textures and preview shaders. This is great for quickly previewing an asset without the need to open a full 3D software application like Maya or Houdini.
It’s great to see that Apple is taking professional users seriously and USD integration into macOS is a great example of this. To show you what it’s like we’ve created a quick demo of this:
HDR CONTENT
High Dynamic Range (HDR) content has been around for a while now and it's slowly become more accessible with new TVs supporting the format alongside mobile phones and tablets. Until we got the Pro Display XDR, we didn’t have a workflow to fully embrace HDR and this is probably the main benefit it will give us moving forward into the future alongside the P3-DCI, resolution, colour accuracy and size.

Within computer animation we are already creating renders that have pixels with brightness values above the standard dynamic range (SDR) maximum of 1.0, which should mean that creating HDR deliverables for past and future projects is fairly straightforward.
Fortunately our studio has adopted the ACES colour space into our pipeline. This is the Academy Color Encoding System, created by the Academy of Motion Picture Arts and Sciences and developed by hundreds of industry professionals.
The advantage of this is that we can easily export any colour space that we need to target whether that’s Rec. 709 for TV broadcast, sRGB for Internet or P3-DCI for Cinema. With Aces already being higher than a 10-bit workflow, we can take this straight over to Davinci Resolve or Final Cut Pro and use it to create a HDR export. We have created a video above that shows how easy it is when working with ACES to export our renders to any requested color space with confidence that is will look correct on the target display, for this project it was a broadcast deliverable so we exported it as Rec. 709, but you can easily export Rec. 2020 for HDR using the same process.
As a proof of concept, we exported our most recent Disney commercial to Final Cut Pro to adjust the grade to suit HDR. We have uploaded this export to YouTube and you can watch the HDR version of the commercial below. For reference go back and watch the SDR version, which looks comparatively quite dull and you can really begin to appreciate HDR as the future of content.
OVERVIEW
The Mac Pro has given us stability in complex workflows and enabled us to create larger, more detailed worlds than we have ever attempted before. We can animate more characters, paint larger textures and simulate more realistic effects. It allows us to work seamlessly across multiple applications simultaneously and we can continue to work while waiting for heavy tasks to process.
There is now more support than ever from developers. It’s great to see support for new technologies that take full advantage of the hardware like the Redshift and Octane GPU renderers and game engines like Unreal. Apple’s dedication to professionals and studio workflows is apparent with the integration of USD in the core of macOS.
The Pro Display XDR has given us the ability to work in the P3-DCI colour space for feature films and develop workflows for HDR which is something we can now offer to our clients with confidence.
We must address the elephant in the room, Apple silicon. We feel reassured that Apple has aided the transition with Rosetta 2 and noticed the cheeky inclusion of Maya already running on it in the announcement keynote. It’s also great to see the developers of the software we use announce support, like Chaos Group noting plans to support ARM based architectures with their V-Ray rendering engine later this year.
If you made it this far thanks for taking the time to read this and we look forward to doing more of these in the future.